
Chapter 12 • Mediastinal Sentinel Lymph Node Biopsy 153
Bibliography
Benti R, Bruno A, Glacomelli M, et al: Internal mammary chain lymphoscintigraphy (IML) and IML-guided internal mammary chain biopsy
(GIMB) in breast cancer. Tumori 1997;83:533-536.
Jansen L, Doting MH, Rutgers EJ, et al: Clinical relevance of sentinel lymph nodes outside the axilla in patients with breast cancer. Br J
Surg 2000;87:920-925.
Johnson N, Soot L, Nelson J, et al: Sentinel node biopsy and internal mammary lymphatic mapping in breast cancer. Am J Surg
2000;179:386-388.
Lacour J, Le M, Caceres E, et al: Radical mastectomy versus radical mastectomy plus internal mammary dissection: Ten year results of an
international cooperative trial in breast cancer. Cancer 1983;51:1941-1943.
Meier P, Ferguson DJ, Karrison T: A controlled trial of extended radical versus radical mastectomy: Ten-year results. Cancer
1989;63:188-195.
Sugg SL, Ferguson DJ, Posner MC, Heimann R: Should internal mammary nodes be sampled in the sentinel lymph node era? Ann Surg
Oncol 2000;7:188-192.
Stibbe PE: The internal mammary lymphatic glands. J Anat 1918;70:257-264.
Testut L, Jacob O: Traité d’Aanatomie Topographique avec Applications Médico-Chirurgicales. Paris, O. Doin, 1905.
Urban JA: Clinical experience and results of excision of the internal mammary lymph node chain in the primary operable breast cancer.
Cancer 1959;12:14-22.
Valdes-Olmos RA, Jansen L, Hoefnagel CA, et al: Evaluation of mammary lymphoscintigraphy by a single intratumoral injection for sentinel
node identifi cation. J Nucl Med 2000;41:1500-1506.
Veronesi U, Marubini E, Mariani L, et al: The dissection of internal mammary nodes does not improve the survival of breast cancer patients:
30-Year results of a randomized trial. Eur J Cancer 1999;35:1320-1325.
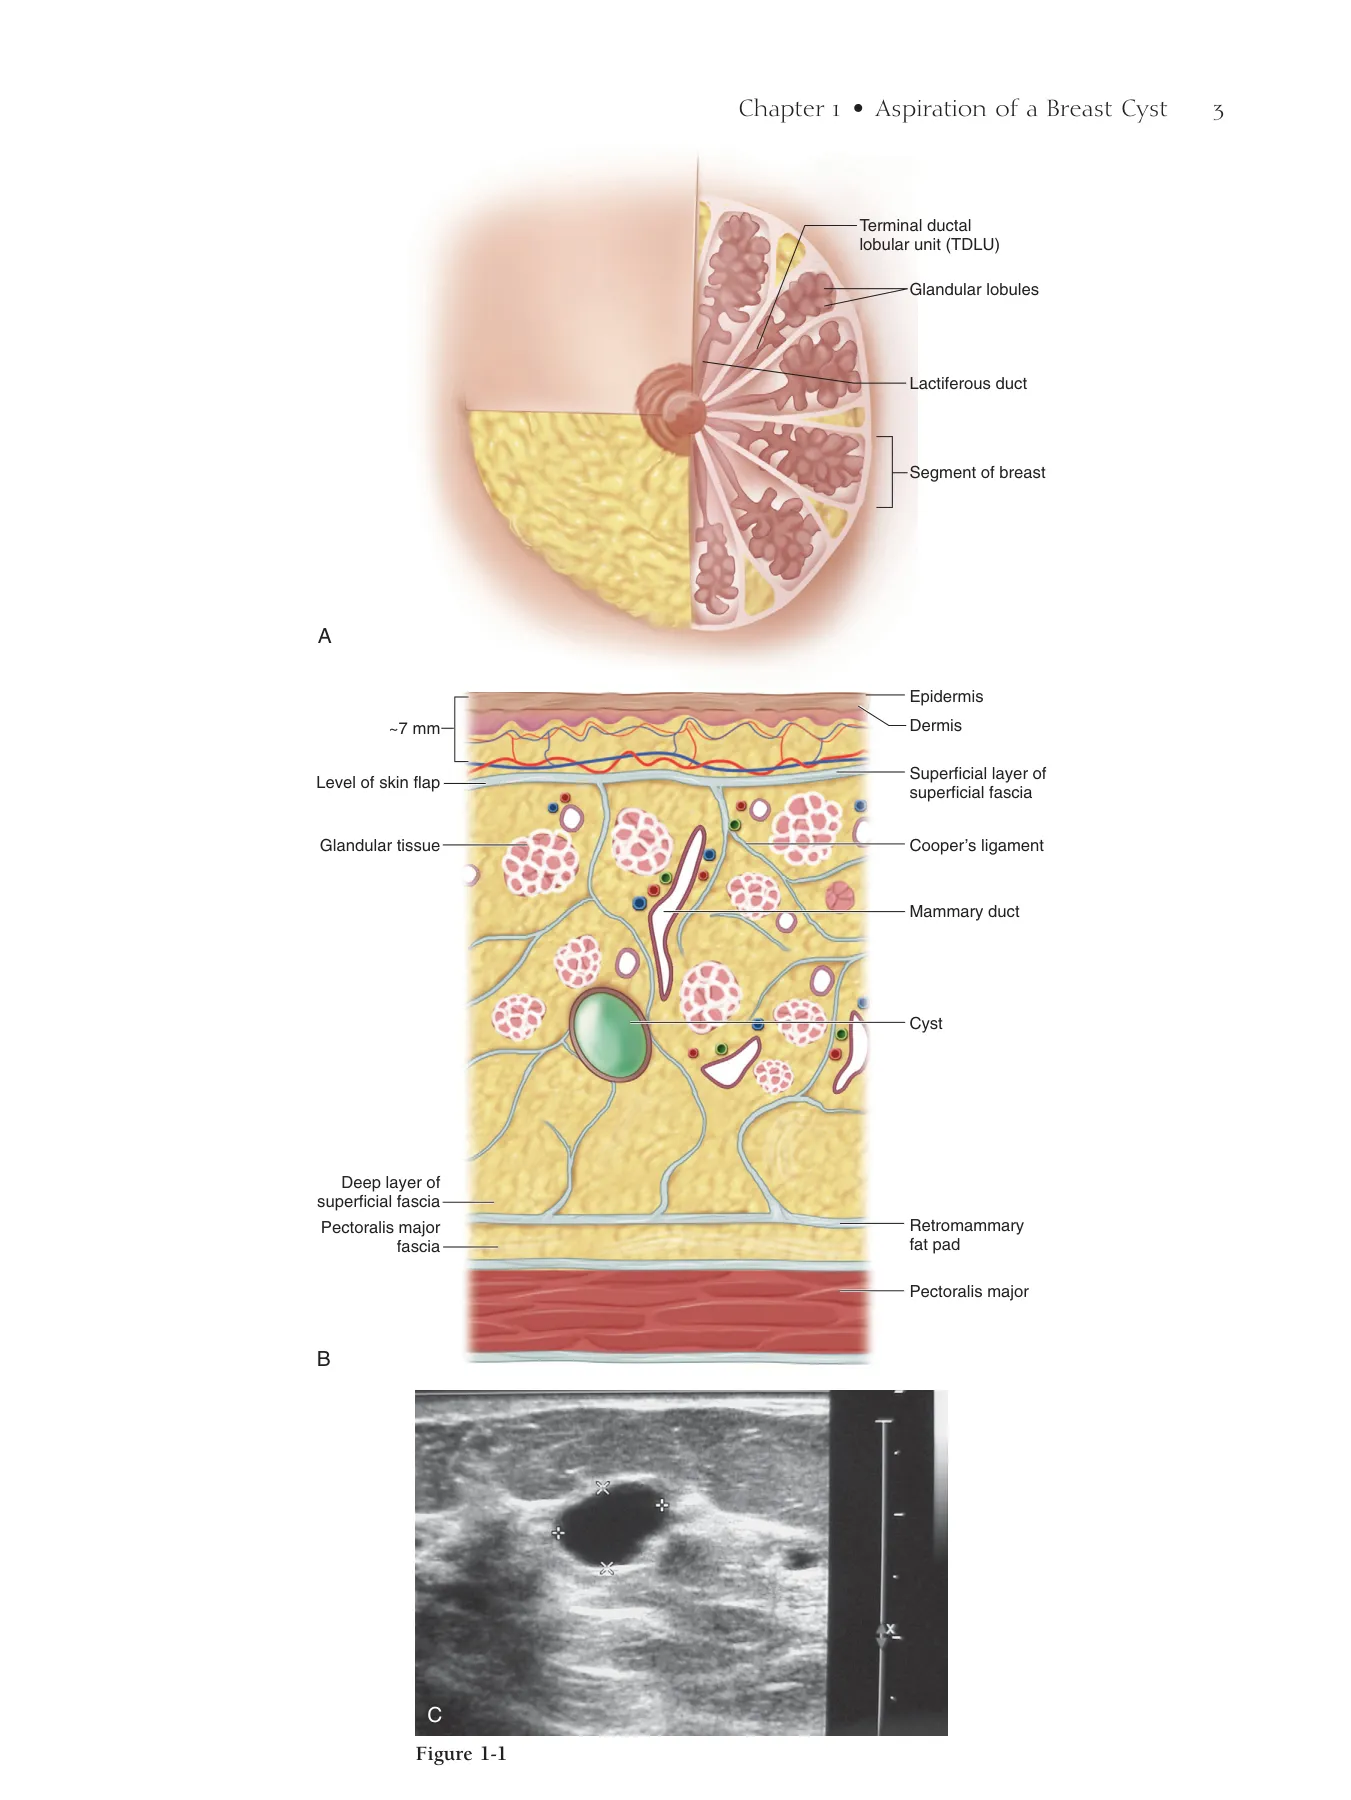
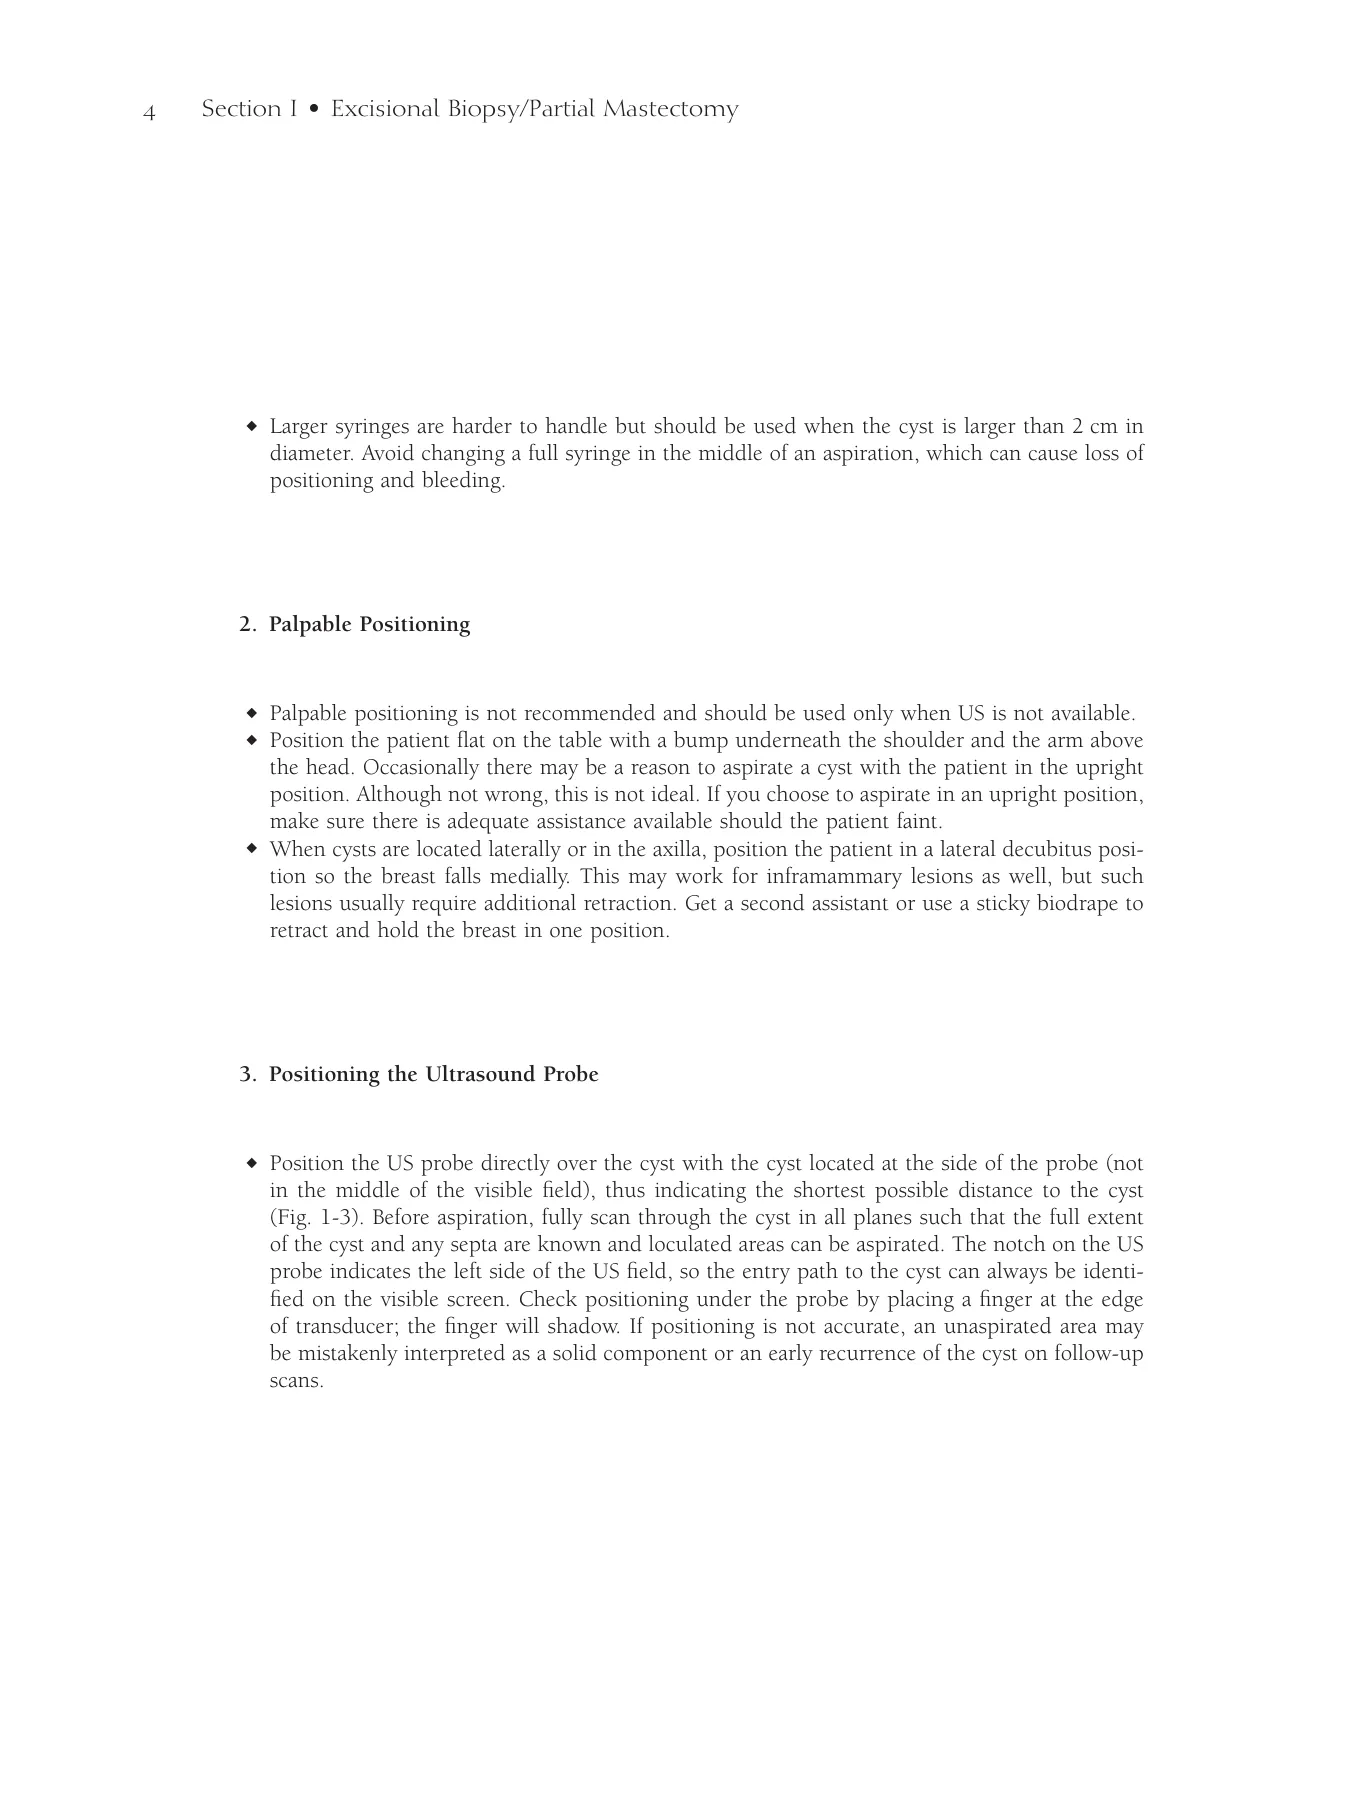
Step 1. Surgical Anatomy
◆ Figure 13-1 demonstrates the surgical anatomy of the axilla from the axillary view.
Step 2. Preoperative Considerations
◆ The indications for axillary lymph node dissection (ALND) include the following:
▲ Positive sentinel lymph
▲ Contraindication to sentinel lymph node detection (e.g., pregnancy)
▲ Clinically palpable nodes
▲ Infl ammatory breast cancer
Step 3. Operative Steps
1. Setup
◆ Drape the arm into the fi eld using a stockinette so that it can be freely mobilized (Fig. 13-2).
◆ Make sure general anesthesia does not include a muscle relaxant so that the nerves can easily
be identifi ed during the dissection.
Axillary Lymph
Node Dissection
V. Suzanne Klimberg
CHAPTER 13
154
Chapter 13 • Axillary Lymph Node Dissection 155
Pectoralis major
Serratus anterior
Pectoralis minor
Latissimus dorsi
Thoracodorsal
vessels and nerve
Teres major
Long thoracic nerve
Axillary vein
Figure 13-1
Figure 13-2
156 Section II • Lymph Node Biopsy
2. Incision
◆ The incision is made below the hair line in the horizontal Langer line from the palpable border
of the pectoralis major (PM) to the palpable border of the latissimus dorsi (LD), (demonstrated
by ink in Fig. 13-3). A longer incision does not provide better exposure because these muscles
defi ne the medial and lateral borders of the axilla, respectively.
◆ The incision also can be made along and just lateral to the border of the PM (Fig. 13-4).
◆ Alternatively, the incision of an outer quadrant lesion can be extended to the axilla. In an
extreme upper outer lesion, the dissection can be performed through the lumpectomy scar.
◆ Take skin directly over a palpable node or one that has eroded the skin.
Chapter 13 • Axillary Lymph Node Dissection 157
A
Border of PM
Border of LD
B
Figure 13-3
A
B
Figure 13-4
158 Section II • Lymph Node Biopsy
3. Dissection
Superior Skin Flap Dissection
◆ Develop the superior fl ap in the approximate 7-mm plane of relatively avascular fat between
the skin and the glandular tissue (Figs. 13-5 and 13-6).
◆ The skin fl aps in the axilla are usually thicker than those from the skin overlying the breast
proper. There seldom is need to take the subcutaneous fat above the axillary fascia because all
axillary lymph nodes are below this plane.
◆ Avoid making the fl ap too thin because it may cause more seroma formation.
◆ The fl ap extends to the fascia of the PM medially and the LD laterally (Fig. 13-7).
Inferior Skin Flap Dissection
◆ The inferior fl ap is developed similarly to the superior fl ap to the PM medially and the LD lat-
erally, but the plane tends to be less well defi ned and almost straight down to the chest wall.
Chapter 13 • Axillary Lymph Node Dissection 159
Cranial
Medial
Caudal
Lateral
Superior flap
Figure 13-5
Pectoralis
major
Latissimus dorsi
Figure 13-6
Cranial
Medial
PM
Caudal
LD
Lateral
Figure 13-7
160 Section II • Lymph Node Biopsy
Lateral Flap Dissection
◆ Make this fl ap slightly thicker (∼1 cm or more with increasing body mass index). Take the fl ap
down to the LD (Fig. 13-8).
◆ Start inferiorly for the fastest way to fi nd the LD and to avoid injury to any nerves or vessels.
If the LD cannot be readily palpated, use the electrocautery to stimulate the muscle to indicate
its location and where to start.
◆ Stay right on the anteromedial border of the muscle. Drifting medially may cause thermal injury
or transect the thoracodorsal nerve or vessels.
◆ Dissecting lateral to the LD will make the fl ap unnecessarily thin while retrieving no additional
lymph nodes. A thin fl ap increases the risk of seroma.
◆ Incise the fascia of the anteromedial border of the LD from inferior to superior to free the axil-
lary contents from the LD.
◆ Continue superiorly to the level of the white tendon of the LD, which is usually found where
the PM crosses over the LD anteriorly. This is the area where the axillary vein rests, and con-
tinuing too far superiorly may cause injury to the axillary vein (Fig. 13-9).
Medial Flap Dissection
◆ Develop the medial skin fl ap in the same plane, connecting the superior and inferior fl aps.
Open the PM fascia from the superior fl ap above to the inferior fl ap below to open up the
axillary contents (Fig. 13-10).
Pectoralis Minor Dissection
◆ Use the electrocautery to free the edge of the PM; the lateral border of the pectoralis minor
(PMi) will then be visible under a fi lmy layer of tissue (Fig. 13-11).
◆ Similarly dissect out the lateral border of the PMi. Stay off the muscle itself. There is no need
to take further fascia. Avoid going too superior on the PMi to prevent thermal injury to the
axillary vein or brachial plexus.
Chapter 13 • Axillary Lymph Node Dissection 161
Lateral flap
Breast
Pectoralis
minor
Pectoralis
major
Latissimus
dorsi
Figure 13-8 Latissimus dorsi muscle with breast removed for
demonstration.
Pectoralis
major
Axillary
vein
Tendon of
the LD
Latissimus dorsi
Figure 13-9 Location of axillary vein at junction of
white tendon of LD and PM with breast removed for
demonstration.
Cranial
Medial
Caudal
Lateral
PM
Figure 13-10 Making medial fl ap.
Cranial
Medial
PMi
PM
Axillary contents
Caudal
Lateral
Figure 13-11
162 Section II • Lymph Node Biopsy
◆ Identify the medial pectoral bundle (Fig. 13-12) coming around the upper third of the lateral
border of the PMi and stop the dissection not more than a few centimeters above that.
◆ Use an appendiceal retractor to lift up the PMi medially. If the medial extent of the axillary vein
cannot be easily visualized, take the medial pectoral bundle with a tie.
◆ Avoid clips here because the rest of the dissection requires considerable retraction, which could
dislodge clips.
◆ Palpate between the PM and PMi and resect any suspect palpable nodes. If lymph nodes are
involved in this area, resect the head of the PMi for full visualization of the axillary lymph node
bed.
Identifi cation of the Axillary Vein
◆ Flex the arm medially and anteriorly to relax the PMi (see Fig. 13-13).
◆ Retract the PM and PMi medially with an appendiceal retractor.
◆ Using your nondominant hand, retract the level II lymph nodes (those immediately behind the
PMi) caudally and laterally. Make a crescent-shaped incision in the fascia. Retraction then frees
the axillary vein at the medial extent of the dissection (Fig. 13-14). This is the easiest place to
identify the vein.
◆ Although a level I and II dissection properly stages the axilla, feel the level III lymph nodes
(posteromedial to the PMi). If these are suspect, bluntly dissect the nodes, freeing them to the
clavipectoral fascia medially, the so-called Halsted ligament.
◆ Avoid taking the level III lymph nodes because this increases the risk of lymphedema. The
venous plexus just below the medial extent of the axillary vein is often the site of unrecognized
bleeding. Double-check this area before closing and use clip and tie for hemostasis.
Chapter 13 • Axillary Lymph Node Dissection 163
Cranial
Medial
PMi
Axillary
vein
Medial
pectoral
bundle
Caudal
Lateral
PM
Axillary vein
Arm lymphatics
Medial pectoral
bundle
Axillary contents
Pectoralis major
Pectoralis minor
Figure 13-12
Figure 13-13
Cranial
Medial
Retracting the
PM and PMi
Axillary vein
Caudal
Lateral
Figure 13-14
164 Section II • Lymph Node Biopsy
Superior Vein Dissection
◆ Lift the PMi medially and retract the axillary contents inferiorly and laterally (Fig. 13-15).
◆ Make an incision just below the axillary vein, taking care not to skeletonize the vein
(Fig. 13-16). Clean the axillary vein medial to lateral with a knife to avoid thermal injury to
the vein.
◆ Take superfi cial vessels with clip and tie. Clip occasional lymphatics coming over the vein. It
is important to avoid skeletonizing the vein.
◆ Take care to stay 1 cm below the vein to avoid injury to the vein as well as the main lymphatic
trunk of the arm, that sometimes can be identifi ed running parallel just beneath the axillary
vein (Fig. 13-17).
◆ A new technique that can be added to the ALND to help identify and thus allow protection of
the lymphatics draining the arm is called axillary reverse mapping (see Chapter 14).
◆ Using a claw-like motion of the nondominant hand, retract inferiorly and perpendicular to the
teres major to identify the thoracodorsal nerve, which sits deep just anterior to the teres major
muscle in the medial angle created by the meeting of the thoracodorsal vessels with the axillary
vein (see Figs. 13-15 and 13-16).
◆ Gentle pinching of the nerve ensures identifi cation by activation of the LD.
◆ Use retraction and blunt dissection to refl ect tumorous lymph nodes off the vein and avoid
injury to the nerve.
◆ If possible, resect tumorous involvement of the vein by resecting part of the vein. Use a 6.0
polypropylene Halsted stitch followed by a whip stitch to repair the vein.
◆ Alternatively, resect as much tumor off of the vein as possible and leave multiple clips on the
vein to identify landmarks for later radiation therapy.
◆ If necessary, all of the vein may be resected, but this signifi cantly increases the risk of subse-
quent lymphedema.
Chapter 13 • Axillary Lymph Node Dissection 165
Cranial
Medial
Long
thoracic
nerve
Axillary
vein
Thoracodorsal
bundle
Caudal
Lateral
Axillary vein
ARM lymphatics
Thoracodorsal
vessels
and nerve
Long thoracic
nerve
Pectoralis major
Pectoralis minor
Serratus
anterior
Axillary
vein
Cranial
Caudal
Lymphatic
trunk
Figure 13-15
Figure 13-16
Figure 13-17
166 Section II • Lymph Node Biopsy
Posterior-Lateral Dissection
◆ Free the thoracodorsal nerve from superior to inferior by blunt dissection with a long, fi ne
tonsil clamp (Fig. 13-18).
◆ Retract the axillary contents laterally and dissect medially, hugging the serratus. The thora-
codorsal nerve should be very deep, almost to the level of the teres (Fig. 13-19). Take care not
to retract too hard to avoid pulling the nerve out laterally, causing misidentifi cation. Gentle
pinching of the nerve ensures identifi cation by activation of the serratus muscle.
◆ Similarly, use a long, fi ne tonsil clamp to free the nerve from superior to inferior. Avoid sever-
ing the nerve by keeping the plain of dissection parallel to the course of the nerve.
◆ Retract the axillary contents inferiorly, freeing them from the teres major posteriorly.
◆ Control troublesome bleeding from the venous plexus that overlies the teres using cautery,
harmonic, or clip and tie.
◆ There are usually three to fi ve intercostobrachial nerves that supply sensation to the
medial-posterior aspect of the arm. These are the only nerves that run medial-to-lateral in
this dissection. They should be spared if they do not directly interfere with the dissection.
◆ Take care to protect the thoracodorsal nerve and long thoracic nerve and vessels.
Chapter 13 • Axillary Lymph Node Dissection 167
Axillary vein
ARM lymphatics
Thoracodorsal nerve
Thoracodorsal vein
Long thoracic
nerve
Pectoralis major
Pectoralis minor
Serratus
anterior
Axillary vein
ARM lymphatics
Thoracodorsal
nerve
Thoracodorsal
vein
Long thoracic
nerve
Pectoralis major
Pectoralis minor
Serratus anterior
Figure 13-18
Figure 13-19
168 Section II • Lymph Node Biopsy
Medial Chest Wall Dissection
◆ Refl ect and retract the axillary contents medially.
◆ First, identify the thoracodorsal nerve superiorly; then, using a knife (heat may damage the
nerve), cut just anterior to the nerve from known to unknown. Take care to cut in the long
axis so that if the nerve is cut, it will merely be a slice and not a transection (Figs. 13-20 [TD,
thoracodorsal] and 13-21).
◆ As the axillary contents are freed from the thoracodorsal nerve, identify the more medial long
thoracic nerve, and similarly free it (see Fig. 13-19).
Chapter 13 • Axillary Lymph Node Dissection 169
Cranial
Medial
Axillary
contents
Axillary
contents
TD
bundle
Caudal
Lateral
A
Cranial
Medial
TD
bundle
Caudal
Lateral
B
Figure 13-20
Cranial
Cranial
Retractor
Retractor
Cranial
Retractor
Serratus
Axillary
vein
LD
LD
LD
Axillary
Lymph
Nodes Lifted Medially
Mediocaudad
Retration
With Finger
Lateral
With Finger
TD Nerve
TD Nerve
TD Nerve
Figure 13-21
170 Section II • Lymph Node Biopsy
◆ Refl ect the axillary contents laterally over your hand and use electrocautery to complete the
dissection from the serratus (Fig. 13-22).
◆ Deliver the axillary contents en bloc from the wound to complete the ALND (Fig. 13-23).
4. Irrigation and Packing of the Wound
◆ The wound is thoroughly irrigated with hot water to remove devascularized fatty tissue. Water
is used for irrigation because tumor cells, if present, will be removed or osmotically lysed. The
wound is then packed with hot lap pads. It is also thought that heat drives the clotting reaction
forward, improving hemostasis. However, irrigation that is too hot can result in a burn.
5. Clean Field
◆ Gloves and instruments are changed and the fi eld redraped. It is thought that blood-soaked
towels or instruments might seed tumor cells.
6. Hemostasis
◆ Examine the fi eld thoroughly for torn vessels that are not necessarily bleeding and ligate them
with clip or tie. Avoid electrocautery near the larger veins or nerves to prevent thermal injury.
Avoid using clips near the nerves because of the possibility of later nerve impingement or
fi brosis.
7. Drain Placement
◆ A single, large (∼19 Fr) drain is placed in the anterior axillary line, above or below the bra line.
A round Blake drain allows for easiest removal. Two drains are unnecessary. This placement
keeps it within the patient’s sight. Because the drain is the last thing to be removed and leaves
an open wound, placing it in the bra line causes undue and prolonged pain (Fig. 13-24).
Chapter 13 • Axillary Lymph Node Dissection 171
Medial
Caudad
Lateral
Cranial
Figure 13-22
Cranial
Pectoralis major
Pectoralis minor
Long thoracic n.
Thoracodorsal
vessels & nerve
Axillary v.
Caudal
Figure 13-23
Cranial
Medial
Caudal
Lateral
A
Cranial
Medial
Drain in place
Caudal
Lateral
B
Figure 13-24
172 Section II • Lymph Node Biopsy
8. Closure
◆ A variety of different closures are adequate, as long as a seal is maintained so that the drain
works. A 3.0 running polydioxanone (PDS) suture with a 4.0 subcuticular stitch is the fastest
to place.
9. Dressing
◆ Simple Steri-Strips placed horizontally on the wound or external glue are all that are necessary.
Pressure dressings do not prevent seromas.
Step 4. Postoperative Care
◆ The patient usually requires an overnight hospital stay because she must (1) be able to take
pain-relieving and other medications, (2) be able to eat and maintain hydration, and (3) learn
how to take care of the drain. Patients with comorbid conditions may require longer stays.
◆ The patient should be instructed to keep her elbow at her side to lessen fl uid production and
give the fl aps a chance to heal down to the chest wall to prevent seroma formation once the
drain has been removed. The drain should be removed after 7 days if the drainage is less than
30 mL and should be left in no longer than 10 days to prevent infection. Although the practice
is somewhat controversial, some practitioners elect to cover drains with antibiotics. If drain
prophylaxis is chosen, consult with the hospital for the antibiotic that best covers staphylococcal
infection.
◆ Hematomas occur in less than 1% of cases. A small, stable, next-day hematoma can simply be
watched. An enlarging or large hematoma should be opened through the incision, bleeders
ligated, and closed. Most of the time, a specifi c origin of bleeding cannot be located.
Step 5. Pearls and Pitfalls
◆ Seromas occur in about 30% of cases.
▲ Drain the patient percutaneously with a 20-gauge syringe every 2 to 4 days until the fl ap is
healed down and there is no more ballotable fl uid.
▲ If the fl uid continues to accumulate after 3 weeks, palpate the most inferior extent of the
fl uid and make a 3-cm incision in the inferior portion of the palpable seroma. Alternatively,
ultrasound can be used.
Chapter 13 • Axillary Lymph Node Dissection 173
▲ Instruct the patient to manually drain the wound three times a day with a cotton swab
inserted into the wound to act as a wick.
▲ If the wound still does not heal after 2 weeks, take the patient back to the operating room
and remove or scarify the capsule that has formed and close with multiple 3.0 absorbable
stick ties.
▲ Replace the drain if necessary.
◆ Injury to the thoracodorsal or long thoracic nerve, if recognized during surgery, can be repaired
primarily using simple interrupted 9.0 nylon sutures.
◆ Numbness or dysesthesia in the posterior medial arm results from destruction of one or more
of the intercostobrachial nerves, which is more often than not unavoidable.
▲ Numbness may improve over time because there are multiple intercostobrachial nerves. Offer
reassurance.
▲ Amitriptyline or similar neurogenic drugs may be useful for dysesthesias of the arm or chest
wall, sometimes referred to as phantom pain.
◆ In case of injury to the thoracodorsal vessels, clip or tie the vessels. Repair is not necessary
because of the dual blood supply to the LD.
◆ Injury to the lymphatics cannot usually be repaired, and the surgeon usually is not aware
of the injury. The axillary reverse mapping procedure can be used to avoid such injury (see
Chapter 14).
◆ Nerve injuries often are identifi ed postoperatively.
▲ A long thoracic nerve injury presents with a winged scapula. A thoracodorsal nerve injury
presents with weakness of internal rotation and extension or the inability to hold a book
under the arm.
▲ Do not reoperate immediately. These presentations may be due to neurapraxia because of
intraoperative tension. Wait at least 3 months before reoperation to identify and anastomose
the nerves.
◆ Some patients experience postoperative chronic shoulder bursitis after laying supine on the
operative table with the arm immobilized.
▲ Find the trigger point, which is usually located on the middle to lower medial border of the
scapula.
▲ Inject the trigger point with a mixture of 0.5% short-acting anesthetic with epinephrine,
0.5% long-acting anesthetic, and 30 mg methylprednisolone. The patient should experience
immediate relief from the anesthetic and long-term relief from the steroid.
▲ A total of two or three injections may be necessary if symptoms recur. Oral analgesics and
aquatic aerobics may provide additional relief.
◆ If the patient experiences frozen shoulder, consult occupational or physical therapy for range-
of-motion exercises. If the condition is due to pain, a trigger point injection is often helpful. If
the range of motion fails to improve or the condition is not associated with pain, consider an
injection of botulinum toxin (Botox; Allergan, Inc., Irvine, CA).
Bibliography
Kass K, Henry-Tillman RS, Mancino AT, Klimberg VS. Lymphedema review. Womens Oncol Rev 2002;2:240-252.
Step 1. Surgical Anatomy
◆ The anatomy of the axillary lymphatic system has been well described (Fig. 14-1); however,
the areas from which these lymphatics derive have not. Only recently has there been a delinea-
tion between the axillary lymph nodes draining the breast and those draining the arm (Fig.
14-2; SLN, sentinel lymph node). Axillary reverse mapping (ARM) is a method of separating
nodes draining the breast from those draining the arm so that the arm lymphatics can be pre-
served and lymphedema prevented. Five variations have been identifi ed of ARM lymphatics
including 1) above or below the axillary vein; 2) a sling pattern that may come as much as
4 cm below the axillary vein; 3) a lateral apron; 4) a medial apron; and 5) a twine or cord like
pattern of multiple small nodes. All of these usually emanate from the arm just lateral to the
thoracodorsal vessels just under the axillary vein—the so-called “axillary ring”. Often there is
a large node that sits in this area from which the variations spring.
Step 2. Preoperative Considerations
◆ Variations in arm lymphatic drainage put the arm lymphatics at risk for disruption during an
axillary or SLN dissection. Therefore, ARM, or mapping the drainage of the arm with blue dye
(BD), decreases the likelihood of inadvertent disruption of the lymphatics.
◆ ARM may be used for lesions of any size and for those with lymph node involvement.
◆ Signifi cant disturbance of the breast (e.g., previous axillary surgery) may have already disrupted
the arm lymphatics such that ARM may not be effi cacious in this group of patients.
Step 3. Operative Steps
1. Setup
◆ Available materials for localization and biopsy of the SLN include technetium-99m (Tc-99m)
sulfur colloid (fi ltered or unfi ltered) and Tc-99m albumin (see Chapter 11).
◆ Two to 5 mL of 1% isosulfan BD (1% isosulfan blue) is reserved for injection into the arm.
Methylene blue has been demonstrated to cause necrosis of the skin when injected intradermally
Axillary Reverse Mapping
V. Suzanne Klimberg
CHAPTER 14
174
Chapter 14 • Axillary Reverse Mapping 175
Supraclavicular n.
Apical n.
Central n.
Subscapular n.
Lateral n.
External
mammary n.
Lateral
collecting route
Medial collecting route
Subareolar plexus
To rectus
sheath and
subperitoneal
plexus
To
contralateral
breast
To internal
mammary n.
Systemic
dissemination
Rotter’s n.
Transpectoral
route
Figure 14-1
1
1
2
3
4
5
Axillary vein
SLN
Stellate breast
cancer
Nipple/areola
ARM Variations
Figure 14-2
176 Section II • Lymph Node Biopsy
or subcutaneously, and therefore its use should be avoided if possible. When using methylene
blue, it is necessary to dilute it by at least half.
◆ The patient is placed supine with the arm extended at a right angle.
2. Injection of Radiopharmaceutical
◆ If an SLN biopsy is to be performed, the radioactive tracer may be injected into the breast as
instructed in Chapter 11.
3. Injection of Blue Dye
◆ Inject 2 to 5 mL of BD subcutaneously in the ipsilateral upper inner arm along the medial
intramuscular groove of the arm to locate the lymphatics draining from the arm (Fig. 14-3).
◆ This location has the most rapid drainage and it will hide the tattoo from the BD.
◆ After injection, massage the site and then elevate the arm for 5 minutes to enhance arm lym-
phatic drainage.
◆ Inform the anesthesiologist when the BD is injected because a drop may be seen on the oxygen
saturation monitor.
Chapter 14 • Axillary Reverse Mapping 177
A
B
Figure 14-3
178 Section II • Lymph Node Biopsy
4. Excision of Sentinel Lymph Nodes
◆ Once the axillary fascia has been incised, care should be taken not to disturb any blue lymphat-
ics (Fig. 14-4, A and B). The gamma probe should be used to locate the radioactive nodes. Blue
lymphatics should be identifi ed, followed to their destination, and separated from the SLN.
One should dissect down to but not lift up the SLN to avoid misidentifi cation of the SLN. Blue
lymphatics can been seen from the SLN incision in approximately one third of cases, and may
be juxtaposed to the SLN in approximately 5%.
5. Axillary Lymph Node Dissection
◆ The incision is made in the usual fashion (see Chapter 13, Fig. 13-3) unless a mastectomy is
being done at the same time, in which case the axillary lymph node dissection (ALND) is per-
formed through the mastectomy incision (see Chapters 15 and 16).
◆ Once the axillary fascia has been breached, protect all blue nodes and lymphatics seen during
dissection (see Chapter 16). This sometimes can be diffi cult because the blue arm lymphatics
can present as a large apron lying over the breast axillary contents (see Fig. 14-2). This apron
can lie medially or, more commonly, laterally. The blue ARM node may be attached to a large
lymphatic (as large as 6 mm) that may not appear blue itself. The lymphatic may present as a
sling lying 3 to 4 mm below the vein that needs to be dissected free (Fig. 14-5).
Chapter 14 • Axillary Reverse Mapping 179
Axillary vein
A
SLN
ARM
Arm
injection
site
Figure 14-4
Cranial
Medial
Caudal
Lateral
Blue ARM node in
sling pattern 4 cm
below axillary vein
Figure 14-5
B
Blue injection site
Blue lymphatic
seen through skin
Blue ARM nodes in
lateral apron pattern
180 Section II • Lymph Node Biopsy
6. Intraoperative Assessment of Blue Nodes
◆ Palpate the blue ARM nodes. In theory, lymph nodes blocked by tumor could divert the tracer
to an alternate node, and there is a potential for crossover to the ARM node. If there is concern
that the ARM node is involved, it should be excised or biopsied.
◆ Assess the blue ARM nodes for radioactivity. If the blue ARM node shows a level of radioactivity
greater than 10% of that the “hottest” SLN, it should be taken and sent for pathology because
it is also an SLN. This happens in 2% to 3% of patients.
7. Hemostasis
◆ Obtain hemostasis with clip, tie, or electrocautery, but take care when deep in the axilla to
avoid the blue lymphatics and nodes.
8. Closure
◆ Close the axillary or other fascia in layers with 3-0 absorbable sutures, as described in
Chapter 13.
9. Dressing
◆ Steri-Strips parallel to the incision or wound glue are suffi cient. Such a dressing allows the
patient to shower immediately after surgery. There is no need for a pressure dressing.
Step 4. Postoperative Care
◆ Caution the patient against signifi cant arm movement or any exercise that would jostle the
breast and axilla.
◆ As soon as the wound is healed (average <1 week), mobilize the patient’s arm to regain range
of motion.
Chapter 14 • Axillary Reverse Mapping 181
Step 5. Pearls and Pitfalls
◆ Lymphedema has not been reported after successful preservation of the lymphatics identifi ed
by ARM when coupled with either SLN biopsy or ALND; however, follow-up has been short.
Lymphedema may occur if the ARM lymphatics are entrapped in matted involved nodes, in
which case the ARM lymphatic may need to be sacrifi ced. Lymphedema can occur anytime after
surgery, even years later, but is rare without axillary intervention or adjuvant irradiation. The
best protection for the patient is still to avoid infection and to treat any arm infection early and
aggressively.
◆ Most patients have a blue tattoo at the injection site, which may last anywhere from a few days
to 6 months. If a dermal injection is avoided, tattooing is minimized. BD may be injected in
the hand, but when injected under the arm it identifi es the blue ARM nodes more quickly and
has the distinct advantage of being hidden.
◆ If you suspect a blue dye reaction, give the patient 50 mg diphenhydramine intravenously. If
there is no doubt, add 100 mg methylprednisolone. Admit the patient for close observation for
at least 24 hours.
◆ If oxygen desaturation occurs, do nothing if there are no other indications of a problem and
the desaturation coincides with BD injection. This is a false desaturation and is simply a moni-
toring problem.
Bibliography
Boneti C, Korourian S, Bland K, et al: Axillary reverse mapping: Mapping and preserving arm lymphatics may be important in preventing
lymphoedema during sentinel lymph node biopsy. J Am Coll Surg 2008;206:1038-1042.
Klimberg VS: A new concept toward the prevention of lymphedema: Axillary reverse mapping. J Surg Oncol 2008;97:563-564.
Mansel R, Fallowfi eld L, Kissin M, et al: Randomized multicenter trial of sentinel node biopsy versus standard axillary treatment in operable
breast cancer: The ALMANAC Trial. J Natl Cancer Inst 2006;98:599-609.
Sakorafas G, Peros G, Cataliotti L: Sequelae following axillary lymph node dissection for breast cancer. Expert Rev Anticancer Ther
2006;6:1629-1638.
Thompson M, Korourian S, Henry-Tillman R, et al: Axillary reverse mapping (ARM): A new concept to identify and enhance lymphatic
preservation. Ann Surg Oncol 2007;14:1890-1895.
Step 1. Surgical Anatomy
◆ Figure 15-1 shows the borders of the simple mastectomy (SM).
▲ Superiorly—1st and 2nd rib
▲ Inferiorly—the rectus
▲ Medially—the sternum
▲ Laterally—the ill-defi ned border of the breast approximately the mid axillary line
Step 2. Preoperative Considerations
◆ The indications for SM include the following:
▲ First and most important, review the diagnostic biopsy results (either from your institution
or elsewhere) with the pathologist. A cytologic diagnosis is not adequate evidence to remove
a breast.
▲ Prophylactic contralateral SM is indicated in those patients with a high risk of bilaterality
(lobular pathology, locally advanced, infl ammatory invasive breast cancer [IBC], multicen-
tricity with a family history) or who cannot reliably be screened (diffi cult mammography or
examination).
▲ For either a primary or contralateral mastectomy, decide ahead of time whether there is a
risk of undetected or underestimated IBC. If the risk is suffi ciently high, consider a sentinel
lymph node biopsy before removal of the breast. If IBC is found in the fi nal pathologic
examination and the axilla was not staged before removal of the breast, the patient will need
a level I and II axillary lymph node dissection.
▲ Other common uses of SM are in patients who have just undergone a lumpectomy and axil-
lary staging and fi nal pathology has revealed positive margins, patients who later develop a
local recurrence, and those who simply desire a mastectomy.
▲ In men, it is not uncommon to perform an SM for refractory gynecomastia.
Simple Mastectomy
V. Suzanne Klimberg
CHAPTER 15
184
Chapter 15 • Simple Mastectomy 185
Superficial limits
of dissection
Deep limits of
dissection
Figure 15-1
186 Section III • Mastectomy
Step 3. Operative Steps
1. Anesthesia
◆ General anesthesia is best and safe for most patients. Spinal or epidural anesthesia or local
blocks can be used alone or in combination to avoid general anesthesia, or with general anes-
thesia to reduce postoperative pain. SM can be performed using local anesthesia alone with a
mixture of short- and long-acting anesthetics injected in the fat plane between the skin and the
glandular tissue of the breast. Others have reported using the instillation of a local anesthetic
to facilitate the dissection.
2. Position
◆ The patient is positioned at the edge of the table with the arm abducted at 90 degrees (Fig.
15-2). This positioning provides the best exposure to the patient and avoids the need for con-
stant leaning over that could lead to back strain.
◆ Padding on the arm board should be adjusted so that the arm is level with the body. Too much
or too little padding may cause a brachial nerve neuropraxia. For SM, there is no need to drape
the lower arm into the fi eld because the arm will remain stationary. Padding should be placed
under the wrist to avoid radial nerve neuropraxia.
Chapter 15 • Simple Mastectomy 187
A
B
Figure 15-2
188 Section III • Mastectomy
3. Incision
◆ The standard incision is an ellipse in the plane of the tumor and the nipple-areolar complex,
and can be done in virtually any orientation (Fig. 15-3). Ideally, if the tumor is at the 3 o’clock
position, the incision will be horizontal, and if at the 12 o’clock position, it will be vertical. In
practice, most incisions are horizontal or diagonal. The medial border will be 2 or 3 cm from
the sternal edge and the lateral border should extend only to the lateral border of the pectoralis
major or edge of the latissimus.
◆ Skin directly over a tumor, especially a superfi cial one (<1 cm from skin), should be taken.
◆ Avoid taking too big an ellipse, or closure will be diffi cult.
◆ The tendency to extend the lateral border of the incision posteriorly to incorporate redundant
skin and fat underneath the arm increases the risk of lymphedema and should be avoided.
◆ If immediate reconstruction is contemplated, a “skin-sparing” incision is used. This can simply
consist of a much smaller ellipse around the nipple–areolar complex when using implants, or
a circular incision encompassing or just inside the nipple–areolar complex when bringing tissue
and skin for a tissue reconstruction (Fig. 15-4).
◆ When the areolar requires removal, a lollipop incision—making a radial incision (laterally or
infraareolar) in the inframammary fold—can give better exposure and projection to the recon-
structed breast.
◆ Some have begun to use a total skin-sparing or nipple-sparing procedure using an inframam-
mary fold incision or a vertical radial incision from the limbus to the inframammary fold.
Chapter 15 • Simple Mastectomy 189
Inframammary
fold
Areolar
Small elilpse incision
Circumareolar
Lollipop
incision
Inframammary
fold
Areolar
Vertical
infraareolar
Vertical
infraareolar
Small ellipse incision
Circumareolar
Lollipop
incision
Harrington (vertical incision)
Stewart (horizontal
elliptical incision)
Orr (oblique, most
favorable for
reconstruction)
Design of incisions
Figure 15-3
Figure 15-4
190 Section III • Mastectomy
4. Dissection
Superior Skin Flap Dissection
◆ In the average patient there is an approximately 7-mm plane of relatively avascular fat between
the skin and the glandular tissue; this is the plane that should be used to develop the fl ap (Fig.
15-5). The thickness of the plane varies with the habitus of the patient.
◆ Too thin or too thick a fl ap results in greater than ordinary bleeding, and you may end up
leaving more breast tissue behind than intended. If the fl ap is too thick, simply take a little
more tissue, usually with a knife or curved Mayo scissors. If the fl ap is too thin, especially at
the base, necrosis might result. Therefore, as you approach the chest wall, purposefully make
the fl ap thicker to avoid severing feeder vessels, but not so thick as to produce a ridge of tissue
on closure. Using a dilator can help defi ne the plan of the fl ap (Fig. 15-6).
◆ The fl ap should be taken superiorly to the level of the fi rst or second rib and the fascia of the
pectoralis major incised (Fig. 15-7) medially to the edge of the sternum, taking care to preserve
the internal mammary perforators, and laterally to the edge of the pectoralis major. Because the
fascia of the breast melds with the fascia of the pectoralis, the latter is incised in preparation
for the anterior dissection.
◆ A lap is left in place to deter oozing while the other fl aps are developed.
Avascular fatty plain
Skin
Glandular
tissue
Figure 15-5
Chapter 15 • Simple Mastectomy 191
Cervical dilator
Clavicle
Sternum
A
A
Breast
Pectoralis
major
B
Figure 15-6
Figure 15-7
B
Skin flap
Holes made by
dilators to delineate
plane of dissection
Breast
retracted
C
Skin flap
Breast
192 Section III • Mastectomy
Inferior Skin Flap Dissection
◆ The inferior fl ap is developed similarly to the superior fl ap, using the dilator (Fig. 15-8) or hot
or cold cutting dissection, but the plane tends to be less well defi ned.
◆ The breast tissue extends to the rectus inferiorly, just at or below the inframammary fold. The
fascia of the pectoralis major is incised with electrocautery.
◆ The pectoralis major and rectus muscles can be easily torn in the medial part of this dissection,
so care must be taken not to retract too vigorously in this area. If either muscle is torn the
surgeon can elect to sew it back into place.
Medial Skin Flap Dissection
◆ The medial fl ap is developed in the same plane connecting the superior and inferior fl aps. The
opening in the pectoralis fl ap is connected from above to below along the sternal border. Note
that the dissection is directly on top of the chest wall and that past-pointing with the electro-
cautery or knife can lead to a pneumothorax.
◆ As you develop the medial fl ap, identify and avoid the perforators (Fig. 15-9). Clips should not
be used here because they can leave palpable scars later in this thin area. These vessels tend to
retract. A stick tie should be used to quell bleeding.
Lateral Skin Flap Dissection
◆ The lateral dissection is slightly thicker than the other fl aps and less well defi ned.
◆ The fl ap is taken down to about the level of the pectoralis muscles and then diagonally into
the chest wall (serratus), taking the breast tissue but staying out of the axilla and well away
from the nerves.
◆ Take care not to past-point because the serratus is all that separates you from the chest wall
and a pneumothorax.
Chapter 15 • Simple Mastectomy 193
Dilator delineating
plane of dissection
for inferior flap
IM perforators
Figure 15-8
Figure 15-9
194 Section III • Mastectomy
Anterior Chest Wall Dissection
◆ With the surgeon standing below the arm, the breast is retracted down and electrocautery is
used in the plane of the muscle fi bers to remove the breast en bloc with the fascia of the pec-
toralis major (see Fig. 15-7).
◆ Especially in cases of ductal carcinoma in situ or cancer with multiple calcifi cations, radiographs
can be obtained of the ex vivo breast to determine if and where calcifi cations are left behind,
and that area intraoperatively reexcised. Figure 15-13 shows the completed dissection.
Total Skin-Sparing Mastectomy
◆ When a total skin-sparing mastectomy is performed (see Fig. 15-4, B), a cervical dilator can be
used to develop the fl ap from any incision (Fig. 15-10). See Chapter 16 for greater detail.
◆ Once the fl ap is developed, the anterior dissection is completed fi rst. A C-Strang retractor is
very helpful to lift the breast off the chest wall (Fig. 15-11). The skin fl ap is then taken superi-
orly, using the cautery to cut between and connect the cervical dilator holes, which serve as a
guide to the correct plane.
◆ When the nipple–areolar complex is reached, it is dissected sharply from the skin with care
taken to remove all of it (Fig. 15-12). A separate core biopsy should be taken and sent to
pathology to ensure negative margins during surgery.
5. Irrigation and Packing of the Wound
◆ The wound is thoroughly irrigated with hot water to remove devascularized fatty tissue. Water
is used for irrigation because tumor cells, if present, will be removed or osmotically lysed. The
wound is then packed with hot lap pads. It is also thought that heat drives the clotting reaction
forward, improving hemostasis.
Chapter 15 • Simple Mastectomy 195
Figure 15-10
Cervical dilator
Clavicle
Sternum
A
B
Cranial
Medial
Caudad
Lateral
Inverted skin
of nipple
Skin flap
Figure 15-11
Figure 15-12
196 Section III • Mastectomy
6. Clean Field
◆ Gloves and instruments are changed and the fi eld redraped. It is thought that blood-soaked
towels or instruments might seed tumor cells.
7. Hemostasis
◆ The fl aps and chest wall are thoroughly inspected for signs of bleeding or for cut vessels that are
not bleeding. A stick suture is needed in the area of the perforators because they tend to retract.
Avoid using clips near the nerves because of the possibility of later nerve impingement.
8. Drain Placement
◆ A single large drain is placed in the anterior axillary line, either above or below the bra line.
The drain should drape into the axilla and rest in the inframammary sulcus (Fig. 15-13). Two
drains are unnecessary. Because the drain is the last thing to be removed and leaves an open
wound, placing it in the bra line causes undue and prolonged pain for the patient.
9. Closure
◆ A variety of different closures are adequate, as long as a seal is maintained so that the drain
works. A 3.0 running polydioxanone suture (PDS) with a 4.0 subcuticular stitch is the fastest
to place (Fig. 15-14).
Chapter 15 • Simple Mastectomy 197
Inframammary
fold
Drain
Inframammary
fold
Cranial
Drain
Figure 15-13
Medial
Caudad
Lateral
Cranial
Figure 15-14
198 Section III • Mastectomy
10. Dressing
◆ Simple Steri-Strips placed horizontally on the wound (to avoid blisters seen with perpendicu-
larly placed Steri-Strips) or external glue are all that is necessary. The pressure dressings used
in the past do not prevent seromas.
Step 4. Postoperative Care
◆ The patient usually requires an overnight hospital stay because she must (1) be able to take
pain-relieving and other medications, (2) be able to eat and maintain hydration, and (3) learn
how to take care of the drain. Patients with comorbid conditions may require longer stays.
◆ Patients undergoing accompanying bilateral implant reconstruction (usually not unilateral) and
tissue reconstruction may need a longer time to recover.
◆ The patient should be instructed to keep her elbow at the side to lessen fl uid production and
give the fl aps a chance to heal down to the chest wall, thus preventing seroma formation after
the drain has been removed. The drain should be removed after 7 days if the drainage is less
than 30 mL and should be left in no longer than 10 days to prevent infection. Although the
practice is somewhat controversial, some practitioners elect to cover drains with antibiotics
specifi c for staphylococci.
◆ Hematomas occur in less than 1% of cases. A small, stable, next-day hematoma can simply be
watched. An enlarging or large hematoma (one that encompasses more than one fourth of the
chest wall) should be opened through the incision, bleeders ligated, and closed. Most of the
time, a specifi c origin of bleeding cannot be located.
Chapter 15 • Simple Mastectomy 199
Step 5. Pearls and Pitfalls
◆ Closure is insuffi cient.
▲ With large tumors, a signifi cant amount of skin may be taken (to encompass the tumor),
making a simple closure impossible.
▲ Once the wound has been thoroughly irrigated, the inferior fl ap can be extended below the
inframammary fold to easily bring the skin edges together. Failing that, the surgeon can swing
a local fl ap.
◆ The fl ap is too thin.
▲ If the dermis has been back-walled in one or several areas, it may affect fl ap viability.
▲ Flap viability can be checked intraoperatively by administering one or two vials of fl uorescein
(after giving a test dose to check for allergic reaction). Under a Wood’s lamp, necrotic areas
will be dark, in sharp contrast to viable areas that fl uoresce green, thus outlining the areas
that need to be resected.
◆ Pneumothorax is a rare complication.
▲ If it is recognized intraoperatively, it requires only evacuation with a red rubber catheter
under positive-pressure ventilation and closure of the opening with a previously placed
pursestring suture.
▲ If it is recognized after surgery, a small chest tube left in place less than 24 hours will
suffi ce.
◆ If margins are positive on pathologic examination, and you believe you have done a good ana-
tomic dissection and no further areas can be dissected, then postoperative irradiation is required
for local control.
◆ The drain is leaking.
▲ This may be a sign of a nonfunctioning drain.
▲ First, strip the drain to make sure it is working. If it is not working, pull it. The patient will
need to be seen every few days to check for and drain the accumulating seroma percutane-
ously with a 20-gauge syringe.
◆ If the drain is removed prematurely, it is not necessary to replace it, but the patient does need
to be followed every few days to check for and drain any fl uid accumulation.
200 Section III • Mastectomy
◆ Seroma feels like ballotable fl uid and occurs in approximately 30% of patients.
▲ A 20-gauge butterfl y on a 30- to 50-mL syringe is used to drain the seroma. The needle is
placed at an angle and preferably over a rib (to avoid pneumothorax) in the most dependent
portion of the wound. The patient should be seen every few days to check and drain reac-
cumulation. An unattended seroma can cause fl ap necrosis.
▲ If a seroma persists beyond 3 to 4 weeks after surgery, an incision (~3 cm) is made in the
most dependent portion of the wound and dressed with gauze. This should close within 2
weeks.
▲ It is rare for a seroma to last more than 3 months. If it does, surgical removal of the capsule
is required (Fig. 15-15).
◆ Uninfected fl ap necrosis can be watched, with the patient taking showers and the eschar
removed as necessary. If it is infected, the patient should go back to the operating room and
the necrotic area resected. If implants have been placed, they should be removed.
◆ Cellulitis occurs in less than 5% of the patients and can be treated with antibiotics. Intravenous
antibiotics are required for up to 6 weeks in those with previous irradiation. Formation of an
abscess, either with the drain in place or associated with a seroma, requires evacuation and
packing.
◆ Neuropraxia can occur from local anesthesia used for postoperative pain or from malpositioning
of the arm. Reassure the patient that function will return, although it may take as long as 6
weeks.
◆ Lymphedema is a late complication and can occur any time after surgery, even years later, but
is rare without axillary intervention or adjuvant irradiation. The best protection for the patient
is to avoid infection and to treat any arm infection early and aggressively (see Chapter 14 for
a discussion of axillary reverse mapping).
Bibliography
Bland KI, Chang HR, Copeland EM: Modifi ed radical mastectomy and total (simple) mastectomy. In Bland KI and Copeland EM (eds):
The Breast: Comprehensive Management of Benign and Malignant Diseases, 2nd ed. Philadelphia, WB Saunders, 1998, pp 881-912.
Fisher B, Anderson S, Bryant J, et al: Twenty-year follow-up of a randomized trial comparing total mastectomy, lumpectomy, and lumpec-
tomy plus irradiation for the treatment of invasive breast cancer. N Engl J Med 2002;347:1233-1241.
Rohrich RJ, Ha RY, Kenkel JM, Adams WP Jr: Classifi cation and management of gynecomastia: Defi ning the role of ultrasound-assisted
liposuction. Plast Reconstr Surg 2003;111:909-923.
Society of Surgical Oncology: Statement on Prophylactic Mastectomy [updated March 2007]. Available at
aspx?id=47.
Vicini FA, Recht A: Age at diagnosis and outcome for women with ductal carcinoma-in-situ of the breast: A critical review of the literature.
J Clin Oncol 2002;20:2736-2744. Review.
Chapter 15 • Simple Mastectomy 201
Seroma capsule
Figure 15-15
Step 1. Surgical Anatomy
◆ Figure 16-1 demonstrates the extent of dissection of the chest wall. The dissection extends from
the 1st or 2nd rib superiorly, to the rectus inferiorly, to the sternum medially, and to the latis-
simus laterally. The classic anatomy of the lymph nodes is demonstrated in Figure 16-2.
◆ Figure 16-3 shows the en bloc anatomy of the chest wall.
◆ Figure 16-4 shows a transverse view of the anatomy and the positioning of nerves and vessels,
demonstrating the positions of the thoracodorsal bundle and the long thoracic nerve relative
to the axillary musculature.
Step 2. Preoperative Considerations
◆ The primary indication for a simple extended mastectomy (SEM) is for a ductal carcinoma in
situ larger than 4 cm (because of risk of recurrence and unidentifi ed invasive cancer), when a
sentinel lymph node (SLN) is not identifi ed or SLN biopsy cannot be performed. The procedure
is rarely performed today.
◆ The indications for a modifi ed radical mastectomy (MRM) include the following:
▲ Negative margins for the primary tumor cannot be achieved, and the SLN is positive.
▲ The tumor is larger than 5 cm.
▲ Nodes are clinically palpable.
▲ Infl ammatory breast cancer is present.
▲ Multiple tumors are present (although recent data indicate that SLN biopsy is feasible in such
patients).
Simple Extended and
Modifi ed Radical
Mastectomy
V. Suzanne Klimberg
CHAPTER 16
202
Chapter 16 • Simple Extended and Modifi ed Radical Mastectomy 203
Pectoral vessels
Pectoralis
major muscle
Pectoralis
minor muscle
Lymphatic
drain from
arm
Intercostobrachial
nerve
Lymphatic drain
to internal
mammary nodes
Rectus sheath
Thoracodorsal
nerve
Long thoracic
nerve
Lymphatic
drainage from breast
Serratus anterior
muscle
Latissimus dorsi
muscle
Teres muscle
Pectoralis major
muscle
Pectoralis minor
muscle
Deep limit
of dissection
Lung
Lateral skin
flap
Lateral branch
of intercostal artery
Perforating
branches
of the internal
mammary artery
Lateral thoracic
artery
Medial
skin flap
Superficial limit of dissection
Thoracodorsal
vessels
Long thoracic nerve
Thoracodorsal nerve is
medial to the vessels
Scapular
lymph nodes
Pectoralis
minor muscle
Latissimus dorsi
muscle
Teres major
muscle
Serratus
anterior muscle
Pectoralis
major muscle
Scapula
IM
Figure 16-3
Figure 16-4
Superficial limits
of dissection
Deep limits of
dissection
Figure 16-1
Deltopectoral
Apical
Central
Lateral
Posterior
Anterior
To external oblique
To internal mammary
Figure 16-2
204 Section III • Mastectomy
Step 3. Operative Steps
1. Setup
◆ Patient setup and positioning are the same as for simple mastectomy, except that in MRM the
arm is prepped and draped into the fi eld using a stockinette so that it can be freely mobilized
(Fig. 16-5).
◆ Make sure the general anesthetic does not include a muscle relaxant so that the nerves can be
easily identifi ed during the procedure.
2. Incision
◆ Encompass the mass or scar by making an ellipse in the plane of a line drawn between the
tumor and the nipple–areolar complex (Fig. 16-6).
◆ The ellipse will be horizontal if the lesion is at 3 o’clock in the left breast and vertical if the
lesion is at 12 o’clock. In practice, most incisions are either horizontal or diagonal.
◆ Make the medial border of the incision 2 or 3 cm from the sternal edge and the lateral border
coinciding with the lateral border of the pectoralis major (PM; when the breast is retracted
medially).
◆ Take skin from directly over a tumor, especially a superfi cial one (<1 cm from skin).
◆ Avoid taking too large an ellipse or closure will be diffi cult.
◆ Avoid extending the lateral border of the incision posteriorly to incorporate redundant skin and
fat underneath the arm; this increases the risk of lymphedema.
◆ Begin with the superior incision (Fig. 16-7).
◆ If you plan on immediately reconstructing the patient, use a “skin-sparing” incision (Fig. 16-8).
Use a much smaller ellipse around the nipple–areolar complex when placing implants, or a
circumareolar incision encompassing the nipple–areolar complex when bringing tissue and skin
from a tissue reconstruction. Use a lollipop incision—a radial incision off the circumareolar
incision—when exposure is inadequate.
◆ In benign disease, perform an areolar or nipple skin-sparing procedure through an inframam-
mary fold incision or infra-areolar vertical incision; in cancer, do this cautiously and only when
the tumor is deep to the skin, away from and not involving the nipple–areolar complex.