
Chapter 16 • Simple Extended and Modifi ed Radical Mastectomy 205
Figure 16-5 Arm mobile in stockinette.
Harrington (vertical incision)
Stewart (horizontal
elliptical incision)
Orr (oblique, most
favorable for
reconstruction)
Design of Incisions
Figure 16-6
Figure 16-7
Small ellipse incision
Areolar
Nipple
Circumareolar
(keyhole)
Inframammary fold
Inferior vertical
incision
Lollipop incision
Figure 16-8
206 Section III • Mastectomy
3. Dissection
Superior Skin Flap Dissection
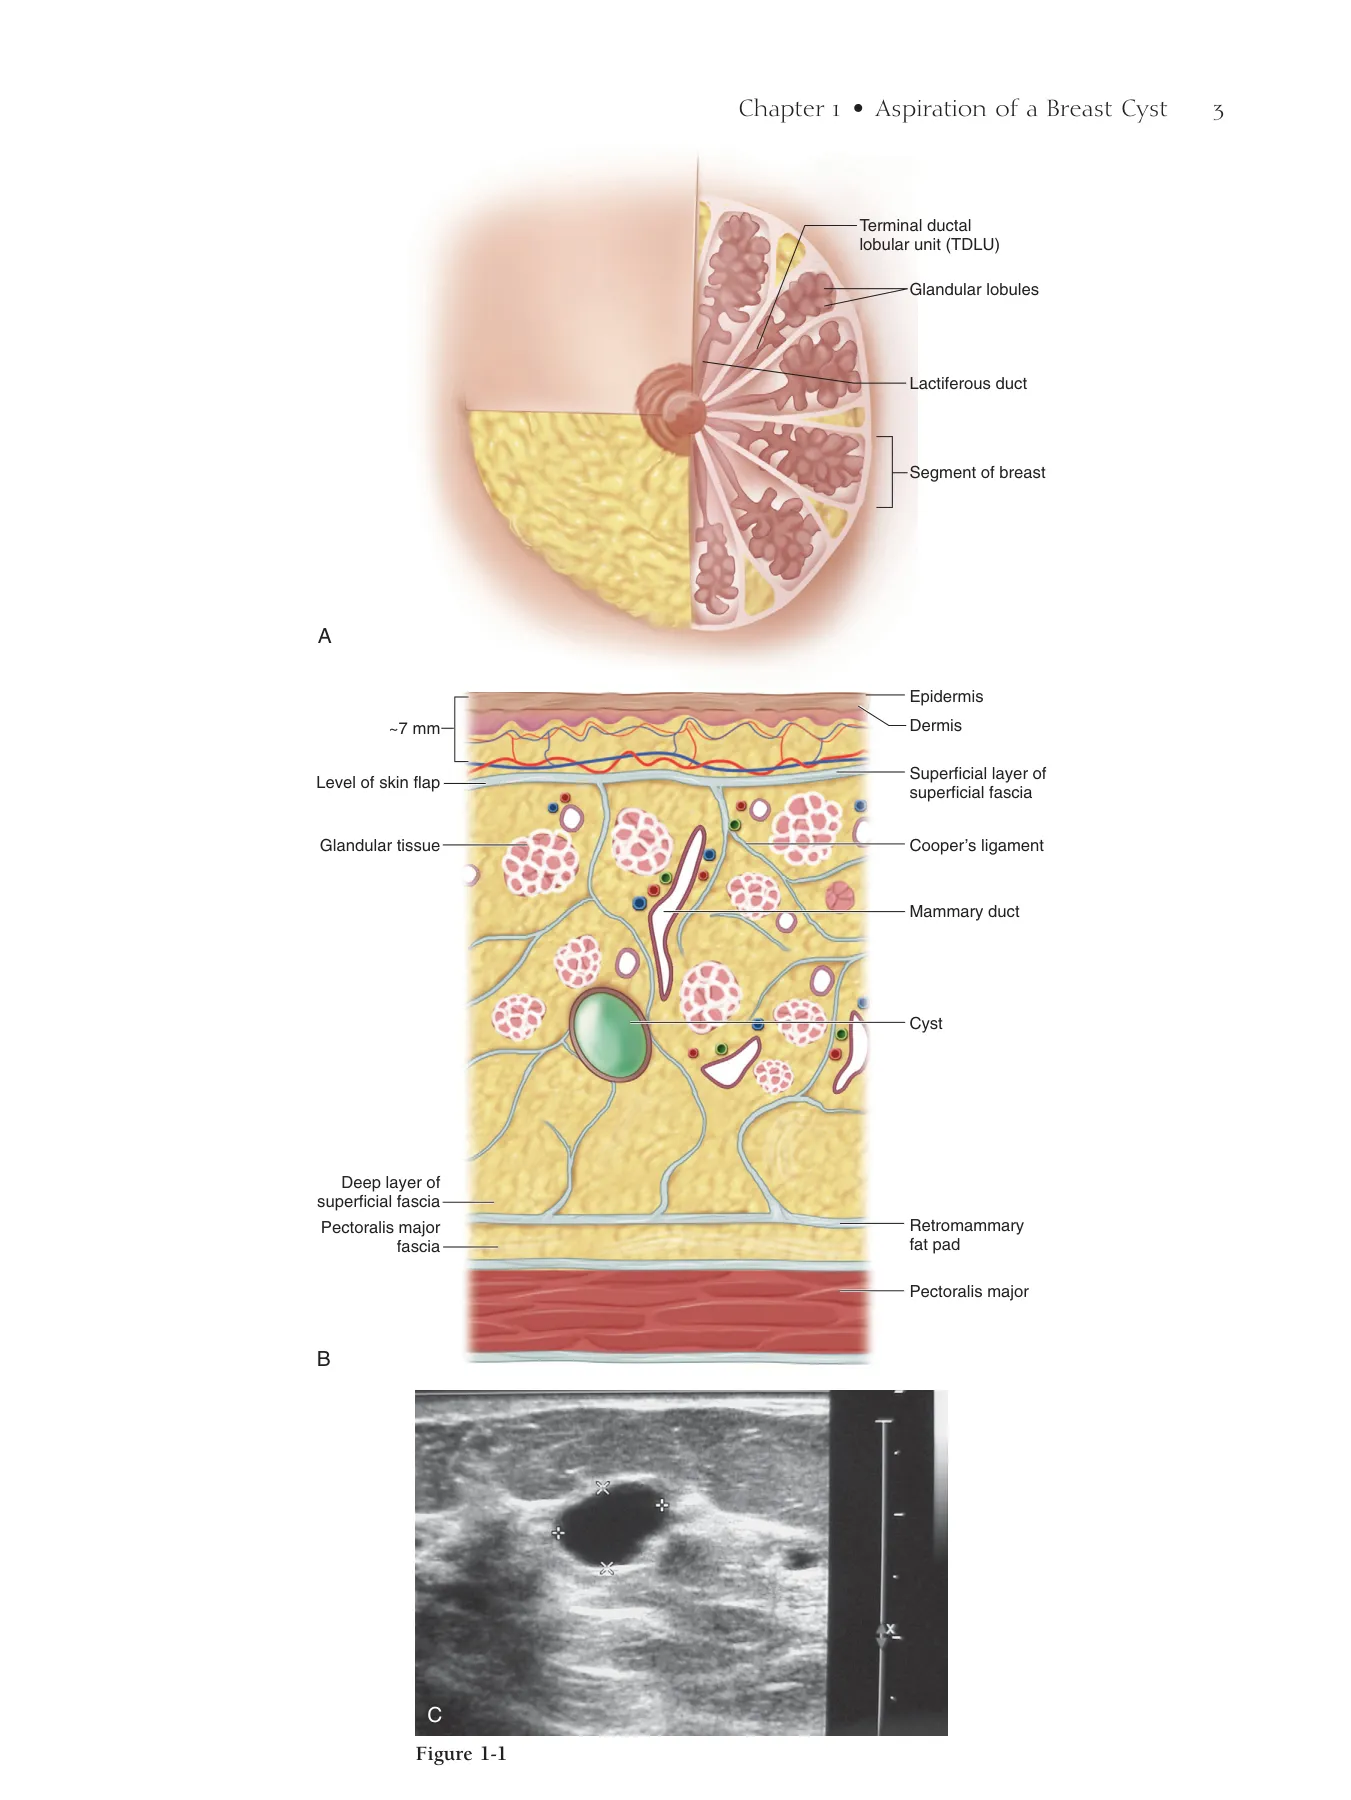
◆ Develop the superior fl ap at an approximately 7-mm-deep plane in the relatively avascular fat
between the skin and the glandular tissue (Figs. 16-9 and 16-10).
◆ Whether performing a traditional incision, a skin-sparing incision, or a total skin-sparing inci-
sion, Pratt cervical dilators may be used (Fig. 16-11) to develop the fl ap from the lower incisions
over the extent of the fl ap (Fig. 16-12). The dilator tracks also serve as a guide to the plane of
dissection leaving holes to guide the proper plane of dissection (Fig. 16-13).
◆ If the amount of bleeding seems greater than ordinary or expected, the fl ap may be too thin or
too thick.
▲ If the fl ap is too thick, simply take a little more tissue using a knife or curved heavy
scissors.
▲ Avoid making the fl ap too thin, especially at the base of the fl ap, which may jeopardize the
vascular supply and cause necrosis. Therefore, as you approach the chest wall, deliberately
make the fl ap thicker to avoid feeder vessels, but not so thick as to produce a ridge on
closure.
◆ Make the fl ap and incise the fascia of the pectoralis major (PM) medially from the edge of the
sternum and laterally to the edge of the PM (see Fig. 15-7).
◆ Leave a lap pad packed in the fl ap to deter unnecessary oozing while the other skin fl aps are
developed.
Chapter 16 • Simple Extended and Modifi ed Radical Mastectomy 207
Plane of skin
flap dissection
Figure 16-9
Avascular fatty plain
Skin
Glandular
tissue
Cervical dilator
Clavicle
Sternum
Dilator holes
delineating plane
of dissection
Figure 16-10
Cervical
dilators
Figure 16-11
Figure 16-12
Figure 16-13
208 Section III • Mastectomy
Inferior Skin Flap Dissection
◆ The inferior fl ap is developed similar to the superior fl ap, but the plane tends to be less well
defi ned.
◆ The breast tissue extends to the inferior border of the PM, adjoining the rectus inferiorly
just at or below the inframammary fold (Fig. 16-14). The fascia of the PM is incised with
electrocautery.
◆ The PM and rectus can be easily torn in the medial part of this dissection. Less retraction in
this part of the dissection is advisable.
Medial Skin Flap Dissection
◆ Develop the medial skin fl ap in the same plane as the superior and inferior fl aps, thus connect-
ing them. Open the PM fascia from the superior fl ap above to the inferior fl ap below and just
lateral to the sternal border. Note that the dissection is directly on top of the chest wall and
that past-pointing with the electrocautery or knife can lead to a pneumothorax.
◆ As you make the medial fl ap, identify and avoid the perforators (Fig. 16-15). Identify them
along the lateral border of the sternum to prevent immediate, as well as delayed postoperative,
profuse bleeding.
◆ Clamp or stick-tie perforators only if necessary because they are a major blood supply to the
medial skin fl ap. Avoid the use of clips here because they can produce palpable scars later in
this thin area. Perforators tend to retract, so use a 3.0 stick tie for hemostasis.
Lateral Skin Flap Dissection
◆ Make this fl ap slightly thicker (approximately 1 cm or more, depending on the patient’s body
habitus). Take the fl ap down to the latissimus dorsi (LD) muscle (Fig. 16-16).
◆ Start inferiorly to locate the LD most quickly and avoid injury to any nerves or vessels.
◆ Use the electrocautery to test around the area inferiorly where the muscle should be. Visible
twitching of the LD indicates where to start the dissection.
◆ Stay directly on the anteromedial border of the muscle. Medial drift may result in thermal injury
or transection of the thoracodorsal nerve or vessels. Dissection lateral to the LD makes the fl ap
unnecessarily thin while retrieving no additional lymph nodes. A thin fl ap increases the risk of
seroma.
◆ Follow the anteromedial border of the LD superiorly.
◆ Stop at the level of the LD (the white tendon where the PM crosses over the LD anteriorly may
be visible). Going too far superiorly may cause injury to the axillary vein.
Chapter 16 • Simple Extended and Modifi ed Radical Mastectomy 209
Lateral flap
Breast
Pectoralis
minor
White tendon of
the latissimus
Latissimus
dorsi
B
Skin
flap
Plane of dissection
IM perforators
Figure 16-14
Figure 16-15
Figure 16-16
Head
Lateral
Latissimus dorsi
Latissimus dorsi
Pectoralis major
Pectoralis major
Latissimus dorsi
Pectoralis major
Breast
A
210 Section III • Mastectomy
Anterior Chest Wall Dissection
▲ The procedure is the same as that in a simple mastectomy. Incise the PM fascia superiorly
(Fig. 16-17). Begin to resect fascia from the muscle, carrying it down inferiorly (Fig. 16-18).
Alternatively, the dissection can be completed from lateral to medial or inferior to superior
depending on incision and exposure.
▲ Examine the radiologic studies and rock the tumor (if palpable) back and forth to determine
the likelihood of PM involvement posteriorly. Be mindful of possible muscle involvement in
any patient with a posteriorly located lesion.
▲ If the muscle is involved, resect the area around it without disturbing the tumor, using
electrocautery.
▲ Bimanually palpate the muscle to rule out unexpected diffuse muscle involvement, which,
if present, necessitates resection of the entire PM, as in a radical mastectomy.
Chapter 16 • Simple Extended and Modifi ed Radical Mastectomy 211
Figure 16-17
Breast
Pectoralis
major
B
A
A
Feet
PM
B
PM
PM
Breast
D
C
Head
Medial
Lateral
PM
Figure 16-18
212 Section III • Mastectomy
Pectoralis Minor Dissection/Resection
▲ Refl ect the breast laterally (Fig. 16-19). The weight of the breast puts tension on the lateral
border of the PM.
▲ Use electrocautery to free the edge of the PM. The lateral border of the pectoralis minor (PMi)
will then be visible under a fi lmy layer of tissue (see Fig. 16-19).
▲ Similarly dissect out the lateral border of the PMi (see Fig. 16-19). Stay off the muscle itself.
There is no need to take further fascia. Avoid going too superior on the PMi, risking thermal
injury to the axillary vein or brachial plexus.
▲ Identify the medial pectoral bundle (Figs. 16-20 and 16-21) coming around the upper third
of the lateral border of the PMi, and stop the dissection no more than a few centimeters
above the medial pectoral bundle. This is not necessary for an SEM because that procedure
takes the level I lymphatics (i.e., those lateral to the PMi).
Chapter 16 • Simple Extended and Modifi ed Radical Mastectomy 213
Cranial
Caudal
Pectoralis major
Pectoralis major
Pectoralis minor
Pectoralis minor
Pectoralis major
Pectoralis minor
Lateral
Medial
Lateral
Caudal
Superior
PMi
Medial
Medial
pectoral
bundle
Pectoralis
major
Pectoralis minor
Lateral pectoral
bundle
Medial pectoral
bundle (cut)
Thoracoacromial
vessels
Brachial plexus
Subscapularis muscle
Subscapular artery
Axillary artery
Long thoracic nerve
Intercostobrachial nerve
(branch)
Teres major
Latissimus
Figure 16-19
Figure 16-20
Figure 16-21
214 Section III • Mastectomy
▲ Use an appendiceal retractor to lift up the PMi medially (Fig. 16-22). If the medial extent of
the axillary vein cannot be easily visualized, take the medial pectoral bundle with clip and
tie. Do not use clips alone here because the rest of the dissection requires considerable retrac-
tion in this area and clips will be easily dislodged.
▲ Palpate between the muscles and resect any suspect, palpable nodes (Rotter’s nodes). If lymph
nodes are involved in this area, resect the PMi for full visualization of the axillary lymph
node bed.
◆ Resection of the PMi:
▲ This resection is not included in an SEM or necessary for an MRM unless there is involve-
ment of the PMi or inability to access the axillary vein medially. Removal of the PMi is termed
a Patey MRM. Without resection of the PMi, the operation is referred to interchangeably as
the Auchincloss, Madden, or Handley MRM.
▲ Finger-dissect on the medial side of the PMi near its insertion on the coracoid process
(Fig. 16-23).
▲ Put your fi nger directly behind the tendon that inserts into the coracoid process and transect
with the electrocautery.
▲ Retract the cut tendon laterally and use electrocautery to transect the origin of the muscle
from the 2nd through 5th ribs.
Identifi cation of the Axillary Vein
◆ When PMi is not resected the assistant will need to fl ex the patient’s arm medially and anteriorly
to relax the PMi, resting the patient’s arm on yours (Fig. 16-24).
◆ Retract the PM and PMi medially with an appendiceal retractor (see Fig. 16-22).
◆ Using your nondominant hand, retract the level II lymph nodes (those immediately behind the
PMi) caudad and laterally. This is not necessary for an SEM.
◆ Make a crescent-shaped incision in the fascia. Retraction then frees the axillary vein at the medial
extent of the dissection (see Fig. 16-22). Medially is the easiest place to identify the vein.
◆ Alternatively, retract the level I lymph nodes (those lateral to the PM and PMi) caudad and
sharply dissect directly down at the level of the axillary vein, taking care to stay 1 cm below
the vein because lymphatics may course just below the vein (Fig. 16-25). This is most com-
monly done for an SEM.
◆ A level I and II dissection properly stages the axilla. Palpate the level III lymph nodes (medial
to the PMi). If they are suspect, bluntly and blindly dissect the nodes free to the clavipectoral
fascia, medially.
◆ Avoid taking the level III lymph nodes because this increases the risk of lymphedema on average
from approximately 30% with a level I and II lymph node dissection to approximately 50%
with a level I to III dissection.
◆ The venous plexus just below the medial extent of the axillary vein is often the site of unrec-
ognized bleeding. Double-check this area before closing.
Chapter 16 • Simple Extended and Modifi ed Radical Mastectomy 215
Axillary v.
Axillary v.
Axillary v.
Cranial
Cranial
Caudal
Caudal
Pectoralis minor
Pectoralis minor
Pectoralis major
Pectoralis major
Thoracodorsal n.
Thoracodorsal n.
Cranial
Caudal
Pectoralis minor
Pectoralis major
Thoracodorsal n.
Thoracodorsal vessels
Thoracodorsal vessels
Thoracodorsal vessels
Pectoralis major
Pectoralis
minor
tendon
Pectoralis minor
Latissimus dorsi
Breast
Figure 16-22
Figure 16-23
Axillary vein
Arm lymphatics
Pectoralis major
Pectoralis minor
Arm flexed and
rotated inwardly
Axillary v.
Cranial
Caudal
Lymphatic
trunk
Figure 16-24
Figure 16-25
216 Section III • Mastectomy
Superior Vein Dissection
◆ See Figure 16-22 for anatomic landmarks.
◆ Lift the PMi and retract medially and axillary tissue inferiorly.
◆ Incise the fascia lying just below the axillary vein. If there is a venous plexus here, use multiple
clips. This is the most common site of residual bleeding.
◆ Clean the axillary vein from medial to lateral with a knife to avoid thermal injury to the vein.
◆ Take superfi cial vessels with clip and tie. Clip occasional lymphatics coming over the vein. It
is important not to skeletonize the vein.
◆ Take care to stay 1 cm below the vein to avoid injury to the vein as well as the main lymphatics
from the arm that can often be identifi ed running parallel to and just beneath the axillary vein
(see Fig. 16-25). Also see Chapter 14 for Axillary Reverse Mapping that can be added to
MRM.
◆ Retracting inferiorly, identify the thoracodorsal nerves, which sit deep just anterior to the teres
major in the medial angle created by the meeting of the thoracodorsal vessels and the axillary
vein (Figs. 16-26 and 16-27).
◆ Gentle pinching of the nerve ensures identifi cation by activation of the LD.
◆ Use retraction and blunt dissection to refl ect tumorous lymph nodes off of the vein and to avoid
injury to the nerve.
◆ Resect tumorous involvement of the vein if possible by resecting part of the vein.
◆ Alternatively, resect as much tumor off of the vein as possible and leave multiple clips on the
vein to identify landmarks for later radiation therapy.
◆ All of the vein may be resected if necessary, but this will certainly increase the risk of post-
operative lymphedema.
Posterolateral Chest Wall Dissection
◆ See Figures 16-26 and 16-27 for anatomic landmarks.
◆ Free the thoracodorsal nerve from superior to inferior by blunt dissection with a long, fi ne
tonsil clamp (Fig. 16-28).
◆ Retract the axillary contents inferiorly and dissect medially, hugging the serratus. The long
thoracic nerve should lie very deep, almost to the level of the teres. Do not retract too vigor-
ously to avoid pulling the nerve out laterally, causing misidentifi cation. Gentle pinching of the
nerve ensures identifi cation by activation of the serratus muscle.
◆ Use a long, fi ne tonsil clamp to free the long thoracic nerve from superior to inferior. Avoid
severing nerves by keeping the plain of dissection parallel to the course of the nerves.
◆ Retract the axillary contents inferiorly, freeing them from the teres major posteriorly.
◆ Control troublesome bleeding from the venous plexus that overlies the teres with cautery or
clip and tie.
◆ There are usually three to fi ve intercostobrachial nerves that supply sensation to the postero-
medial aspect of the arm (Fig. 16-29). These are the only nerves that run medial to lateral in
this dissection. Take them with a clip, but spare them if they do not directly interfere with the
dissection.
◆ Take care to protect the thoracodorsal nerve, long thoracic nerve, and associated vessels from
injury.
Chapter 16 • Simple Extended and Modifi ed Radical Mastectomy 217
Axillary v.
Axillary v.
Caudal
Caudal
Thoracodorsal n.
Thoracodorsal n.
Long thoracic n.
Long thoracic n.
Thoracodorsal vessels
Thoracodorsal vessels
Axillary v.
Pectoralis
major
Cranial
Medial
Lateral
Caudal
Thoracodorsal n.
Long thoracic n.
Thoracodorsal vessels
Axillary vein
Arm lymphatics
Thoracodorsal
vessels
and nerve
Long thoracic
nerve
Medial pectoral
bundle
Figure 16-26
Figure 16-27
Intercostobrachial
nerve
Internal mammary
perforating vessels
Serratus anterior
muscle
Latissimus dorsi
Teres major
Figure 16-28
Figure 16-29
218 Section III • Mastectomy
Medial Chest Wall Dissection
◆ Drape a towel over the chest.
◆ Refl ect and retract the breast and axillary contents medially (Fig. 16-30).
◆ First, identify the thoracodorsal nerve lying superiorly and use a knife to cut just anterior to
the nerve from known to unknown. Take care to cut along the long axis so that if the nerve is
cut, it will merely be a slice and not a transection.
◆ As the axillary contents are freed from the thoracodorsal nerve (see Fig. 16-30), identify the
long thoracic nerve lying more medially, and similarly free it.
◆ Refl ect the breast and axillary contents laterally over your hand (Fig. 16-31) and use electro-
cautery to complete the dissection from the serratus.
◆ Deliver the breast and axillary contents en bloc from the wound to complete the MRM
(Fig. 16-32).
Pathologic Marking
◆ Identify with a clip or stitch the superior and lateral borders of the dissection. The lymph nodes
are taken en bloc with the specimen so there is no need to mark them separately.
4. Irrigation and Packing of the Wound
◆ The wound is thoroughly irrigated with hot water to remove devascularized fatty tissue.
Water is used for irrigation because tumor cells, if present, will be removed or osmotically
lysed. The wound is then packed with hot lap pads. It is also thought that heat drives the
clotting reaction forward, improving hemostasis. However, irrigation that is too hot can result
in a burn.
Chapter 16 • Simple Extended and Modifi ed Radical Mastectomy 219
Cauda
Caudal
Axillary contents
Axillary contents
Axillary contents
Cranial
Cranial
Cranial
A
Caudal
Medial retraction
Medial retraction
of breast
of breast
Medial retraction
of breast
Long thoracic nerve
Long thoracic nerve
Long thoracic nerve
Axillary vein
Pectoralis major
Nerve lies medial
Pectoralis minor
Serratus anterior
Arm lymphatics
Thoracodorsal nerve
Thoracodorsal vein
Long thoracic nerve
B
Figure 16-30
Cranial
Caudal
Breast reflected
laterally over hand
Figure 16-31
Cranial
Pectoralis
major
Caudal
A
Pectoralis
major
Arm
Cranial
Pectoralis major
Pectoralis minor
Long thoracic nerve
Thoracodorsal
vessels & nerve
Axillary v.
Caudal
B
Figure 16-32
220 Section III • Mastectomy
5. Clean Field
◆ Gloves and instruments are changed and the fi eld re-draped. It is thought that blood-soaked
towels or instruments might seed tumor cells.
6. Hemostasis
◆ Examine the fi eld thoroughly for torn vessels that are not necessarily bleeding and ligate them
with clip or tie. Avoid electrocautery near the larger veins or nerves to prevent thermal injury.
Avoid using clips near the nerves because of the possibility of later nerve impingement or
fi brosis.
7. Drain Placement
◆ A single large drain is placed in the anterior axillary line, either above or below the bra line
(Fig. 16-33). Two drains are unnecessary. This placement keeps the drain in the patient’s sight.
Because the drain is the last thing to be removed and leaves an open wound, placing it in the
bra line causes undue and prolonged pain for the patient.
Chapter 16 • Simple Extended and Modifi ed Radical Mastectomy 221
Figure 16-33
Lateral
Medial
Caudal
Cranial
222 Section III • Mastectomy
8. Closure
◆ A variety of different closures are adequate, as long as a seal is maintained so that the drain
works. A 3.0 running polydioxanone suture (PDS) with a 4.0 subcuticular stitch is the fastest
to place (Fig. 16-34).
9. Dressing
◆ Simple Steri-Strips placed horizontally on the wound (to avoid blisters seen with perpendicu-
larly placed Steri-Strips) or external glue are all that is necessary. The pressure dressings used
in the past do not prevent seromas.
Step 4. Postoperative Care
◆ The patient usually requires an overnight hospital stay because she must (1) be able to
take pain-relieving and other medications, (2) be able to eat and maintain hydration, and (3)
learn how to take care of the drain. Patients with comorbid conditions may require longer
stays.
◆ Patients undergoing accompanying bilateral implant reconstruction (usually not unilateral) and
tissue reconstruction may need a longer time to recover. The patient should be instructed to
keep her elbow at the side to lessen fl uid production and give the fl aps a chance to heal down
to the chest wall, thus preventing seroma formation after the drain has been removed. The drain
should be removed after 7 days if the drainage is less than 30 mL and should be left in no
longer than 10 days to prevent infection. Although the practice is somewhat controversial, some
practitioners elect to cover drains with antibiotics specifi c for staphylococci.
◆ Hematomas occur in less than 1% of cases. A small, stable, next-day hematoma can simply
be watched. An enlarging or large hematoma (one that encompasses more than one fourth of
the chest wall) should be opened through the incision, bleeders ligated, and closed. Most
of the time, a specifi c origin of bleeding cannot be located.
◆ About 60% of patients experience nausea or vomiting secondary to anesthesia. A combination
of preoperative dronabinol (Marinol; Solvay Pharmaceuticals, Marietta, GA) and prochlorpera-
zine (Compazine; GlaxoSmithKline, Brentford, United Kingdom) has been shown to drastically
reduce the incidence of this complication.
Chapter 16 • Simple Extended and Modifi ed Radical Mastectomy 223
Lateral
Medial
Caudal
Head
Figure 16-34
224 Section III • Mastectomy
Step 5. Pearls and Pitfalls
◆ The fl ap is too thin.
▲ If the dermis has been back-walled in one or several areas, it may affect fl ap viability.
▲ Flap viability can be checked intraoperatively by administering one or two vials of fl uorescein
(after giving a test dose to check for allergic reaction). Under a Wood’s lamp, necrotic areas
will be dark, in sharp contrast to viable areas that fl uoresce green, thus outlining the areas
that need to be resected.
◆ Torn PM or rectus muscles can be sewn back in place with interrupted 3.0 absorbable
sutures.
◆ Pneumothorax, if recognized intraoperatively, requires only evacuation with a red rubber cath-
eter under positive-pressure ventilation and closure of the opening with a previously placed
pursestring suture. If recognized after surgery, a small chest tube left in place less than 24 hours
will suffi ce.
◆ Thermal injury to the thoracodorsal nerve is irreparable. To repair a transected nerve, trim the
ends and primarily repair with simple 6.0 interrupted absorbable sutures.
◆ Resection of the lateral pectoral bundle may cause atrophy of the PM and fl attening of the chest
wall, affecting mainly cosmesis. Reassurance is all that can be offered.
◆ Some patients experience postoperative chronic shoulder bursitis after laying supine on the
operative table with the arm immobilized.
▲ Find the trigger point, which is usually located on the middle to lower medial border of the
scapula.
▲ Inject the trigger point with a mixture of 0.5% short-acting anesthetic with epinephrine,
0.5% long-acting anesthetic, and 30 mg methylprednisolone. The patient should experience
immediate relief from the anesthetic and long-term relief from the steroid.
▲ A total of two or three injections may be necessary if symptoms recur. Oral analgesics and
aquatic aerobics may provide additional relief.
◆ The axillary vein is injured.
▲ Apply pressure to control hemorrhage until the circulator can get a vascular set on the fi eld
and a small, curved vascular clamp can be applied to the site. Do not use regular clamps on
the vein or you may tear it further.
▲ Repair the vein using an in-and-out Halsted stitch.
▲ Release the clamp and follow with a running 5.0 polypropylene back stitch.
◆ Numbness or dysesthesia in the posterior medial arm results from destruction of one or more
of the intercostobrachial nerves, which is usually unavoidable.
▲ Numbness may improve over time because there are multiple intercostobrachial nerves. Offer
reassurance.
▲ Amitriptyline or similar neurogenic drugs may be useful for dysesthesias of the arm or chest
wall, sometimes referred to as phantom pain.
◆ Seromas occur in about 30% of cases.
▲ Drain the patient percutaneously with a 20-gauge syringe every 2 to 4 days until the fl ap is
healed down and there is no more ballotable fl uid.
▲ If the fl uid continues to accumulate after 3 weeks, palpate the most inferior extent of the
fl uid and make a 3-cm incision directly over the area.
▲ Instruct the patient to manually drain the wound three times a day with a cotton swab
inserted into the wound to act as a wick.
▲ If the wound still does not heal after 2 weeks, take the patient back to the operating room
and remove or schlerify the capsule that has formed and close with multiple 3.0 absorbable
stick ties (Fig. 16-35).
▲ Replace the drain if necessary.
Chapter 16 • Simple Extended and Modifi ed Radical Mastectomy 225
Figure 16-35
226 Section III • Mastectomy
◆ Injury to the lymphatics cannot usually be repaired, and the surgeon usually is not aware of
the injury. If injured lymphatics are identifi ed, clip their ends to avoid the possibility of subse-
quent seroma.
◆ Injury to the thoracodorsal or long thoracic nerve can be repaired primarily using simple inter-
rupted 9.0 sutures.
◆ In case of injury to the thoracodorsal vessels, clip or tie the vessels. Repair is not necessary
because of the dual blood supply to the LD.
◆ If the patient experiences frozen shoulder, consult occupational or physical therapy for range-
of-motion exercises. If the condition is due to pain, a trigger point injection is often helpful. If
the range of motion fails to improve or the condition is not associated with pain, consider an
injection of botulinum toxin (Botox; Allergan, Inc., Irvine, CA).
◆ Nerve injuries often are identifi ed postoperatively.
▲ A long thoracic nerve injury presents with a winged scapula. A thoracodorsal nerve injury
presents with weakness of internal rotation and extension or the inability to hold a book
under the arm.
▲ Do not reoperate immediately. These presentations may be due to neuropraxia because of
intraoperative tension. Wait at least 3 months before reoperation to identify and anastomose
the nerves.
Bibliography
Bland KI, McCraw JB, Copeland EM: General principles of mastectomy: Evaluation and therapeutic options. In Bland KI, Copeland EM
(eds): The Breast: Comprehensive Management of Benign and Malignant Diseases (2nd ed). Philadelphia, WB Saunders, 2004, pp
865-883.
Fisher B, Anderson S, Bryant J, et al: Twenty-year follow-up of a randomized trial comparing total mastectomy, lumpectomy, and lumpec-
tomy plus irradiation for the treatment of invasive breast cancer. N Engl J Med 2002;347:1233-1241.
Fisher B, Jeong JH, Anderson S, et al: Twenty-fi ve year follow-up of a randomized trial comparing radical mastectomy, total mastectomy
followed by YRT. N Engl J Med 2002;347:567-575.
Van Dongen JA, Voogd AC, Fentiman IS, et al: Long-term results of a randomized trial comparing breast-conserving therapy with mastec-
tomy: European Organization for Research and Treatment of Cancer 10801 trial. J Natl Cancer Inst 2000;92:1143-1150.
Veronesi U, Cascinelli N, Mariani L, et al: Twenty-year follow-up of a randomized study comparing breast-conserving surgery with radical
mastectomy for early breast cancer. N Engl J Med 2002;347:1227-1232.
Step 1. Surgical Anatomy
◆ A comprehensive understanding of normal ductal anatomy, as well as its infl uence on the dis-
tribution of cancer in the breast, is critical to planning an oncoplastic partial mastectomy.1,2 An
understanding of this anatomy has not been widely discussed in the context of breast surgery,
despite the fact that the concept of segmental ductal anatomy was thoroughly described in 1840
by Sir Astley Cooper in his classic two-volume atlas of comparative mammary anatomy.3
◆ At present, it is uncertain whether the segmental anatomy of the breast is relatively constant,
like the segmental anatomy of the liver, or if the ductal segmental anatomy varies from individual
to individual or breast to breast. A fundamental challenge for the oncoplastic surgeon is to
determine how each individual cancer is distributed within the breast and to assess whether
the lesion can be resected as a single en bloc fi broglandular resection, as is recommended by
the National Comprehensive Cancer Network (NCCN).4
◆ The modern anatomic analysis of ductal anatomy reported by Love and Barsky suggests that
the number of major ductal systems is probably fewer than 10 (Fig. 17-1, A). The size of ductal
segments is variable: in some cases, a segment can be a narrow “pie slice” of tissue; in other
cases, one ductal segment can occupy up to 25% of the total breast volume5 (Fig. 17-1, B).
◆ Not all ducts pass radially from the nipple to the periphery of the breast; rather, some travel
directly back from the nipple toward the chest wall. According to Cooper, single ductal seg-
ments radiate to the margin of the sternal (medial) and clavicular (superior) aspects of the
breast, with two or three ductal branches layered on each other, thus creating a fuller pad of
fi broglandular tissue in the axillary (lateral) and abdominal (inferior) aspects of the breast.3
Although the ductal branches appear to interdigitate with each other within the breast paren-
chyma, the segments do not communicate with each other through ductal anastomoses.
◆ In contrast to the ductal anatomy, the fi broglandular tissue of the breast has a rich anastomotic
circulatory bed, thereby allowing oncoplastic resection and mastopexy advancement of the
parenchyma to be safely performed. The well-collateralized vasculature of the breast makes it
possible to move and remodel fi broglandular tissue within the skin envelope without major
Oncoplastic Approaches
to the Partial
Mastectomy for Breast
Conservation Therapy
Chin-Yau Chen, Kristine E. Calhoun, and Benjamin O. Anderson
CHAPTER 17
228
Chapter 17 • Oncoplastic Approaches to the Partial Mastectomy 229
Glandular segment
Pectoral fascia
Subcutaneous fat
2nd rib
Pectoralis minor muscle
Intercostal muscle
Pectoralis major muscle
6th rib
Major
lactiferous sinus
Lactiferous
ducts
Suspensory
ligaments
Non-invasive (DCIS)
disease bed
Invasive mass
Areola
Nipple
Lactating
mammary
gland lobules
A
B
Figure 17-1
230 Section IV • Breast Reconstruction
risk of breast devascularization and necrosis. The most common source of arterial blood supply
in the human breast arises from the axillary and internal mammary arteries. By maintaining
communication with one of these two arterial connections, and by limiting the degree of dis-
section between the fi broglandular tissue and skin, an adequate blood supply for the breast
parenchyma is maintained during tissue advancement and mastopexy closure.
◆ Using magnetic resonance imaging, the distribution of a breast cancer can be classifi ed into
three patterns: (1) localized, (2) segmentally extended, or (3) irregularly extended.6 Ductal
carcinoma in situ (DCIS) is often multifocal but unicentric in nature, that is, spreading as many
small, noninvasive tumor foci that can appear discontinuous on histologic analysis but which
are actually intraductally connected within a single major ductal segment.7 When invasive car-
cinoma arises in a segmental bed of DCIS, it commonly arises at the periphery rather than the
center of the DCIS.8 For this reason, the oncoplastic surgeon needs to be thoughtful in design-
ing a tissue resection that encompasses both the noninvasive and invasive components of
disease. Cancer resection intending to remove only a palpable invasive carcinoma will often
produce inadequate surgical margins for its nonpalpable, noninvasive portion. Furthermore,
the oncoplastic surgeon should not assume that the invasive cancer is centrally located within
a segment of noninvasive disease (see Fig. 17-1, B). Instead, mammographic images should be
scrutinized for the presence of microcalcifi cations that may suggest an eccentric distribution of
disease that follows the natural ductal segmental anatomy of the breast.
◆ Using oncoplastic surgical techniques for breast preservation, breast surgeons can achieve wide
surgical margins while preserving the shape and appearance of the breast9 (Table 17-1).
Although oncoplastic techniques vary in type and approach, the general principle of fashioning
the tissue resection to the anatomic shape of the cancer minimizes the removal of uninvolved
breast tissue while ensuring that wide margins, ideally more that 1 cm, are achieved in an
optimal number of patients.1,2
Step 2. Preoperative Considerations
◆ To plan an optimal oncoplastic surgical resection, the surgeon should recognize the limited
degree to which imaging may accurately predict the true histologic extent and orientation of
disease, especially its noninvasive component.
◆ A combination of imaging modalities (diagnostic mammography with magnifi cation views,
ultrasonography, and magnetic resonance imaging when indicated) may yield the best estimates
of tumor size.10
◆ Multiple localization wires can help defi ne the radiographic extent of the nonpalpable calcifi ed
lesions11 (Fig. 17-2).
◆ Consultation with plastic surgery colleagues may be warranted for surgeons without formal
plastic surgery training for the more complex oncoplastic procedures.
TABLE 17-1 Oncoplastic Approaches for Partial Mastectomy
TYPE OF ONCOPLASTIC LUMPECTOMY
CANCER LOCATION
CANCER DISTRIBUTION
Parallelogram mastopexy lumpectomy
Peripheral, except the upper inner quadrant*
Localized or small, segmentally extended
Batwing mastopexy lumpectomy
Central breast
Centrally distributed, without involvement of nipple
Reduction mastopexy lumpectomy
Lower breast, 4 to 8 o’clock position
Localized or small, segmentally extended
Donut mastopexy lumpectomy
Upper or lateral
Segmentally extended
*For lumpectomy in the upper inner quadrant of the breast, it is better not to remove a skin island to avoid nipple–areolar deviation upward and medially.
Chapter 17 • Oncoplastic Approaches to the Partial Mastectomy 231
A
B
5 cm
1 cm
Left
Superior
Inferior
Calcs start 1 cm deep
to skin entry site
Calcs span ~ 5 cm
superior to inferior
Figure 17-2
A and B courtesy of Dr. Kate Dee, Seattle, Wash.
232 Section IV • Breast Reconstruction
◆ Although surgical margins should ideally exceed 10 mm, this width is often incompatible with
an acceptable cosmetic outcome. The general principle of “wider is better” for surgical margins
needs to be tempered by a realistic understanding of breast cosmesis. Low local recurrence rates
after breast conservation therapy, especially in the era of postlumpectomy irradiation, can be
achieved with intermediate surgical margin widths between 1 and 10 mm.4
◆ Before the procedure, the patient’s skin landmarks should be marked with the patient in the
upright position for the purpose of planning the skin incision(s). Relevant skin landmarks
include the inframammary crease, the anterior axillary fold at the pectoralis major muscle, the
posterior axillary fold of the latissimus dorsi muscle, the sternal border of the breast, and the
periareolar circle (Fig. 17-3).
◆ Identifying these landmarks with the patient in the upright position is very important to the
fi nal cosmetic outcome because these anatomic sites may be diffi cult to locate accurately once
the patient is anesthetized and lying supine on the operating room table. During surgery, the
boundaries of the target lesion can be marked sonographically for tumors visible by ultrasound.
The location of the skin incision(s) can be adjusted as needed to ensure that the skin island to
be resected is located directly above the target lesion.
Step 3. Operative Steps
1. Parallelogram Lumpectomy with Mastopexy Closure
◆ This procedure is a full-thickness excision best used for localized or small, segmental cancers
located peripherally in the breast with respect to the nipple–areolar complex (NAC). The
purpose of removing a skin island is to provide adequate access for wide excision of the target
lesion while setting the stage for mastopexy closure of the resulting intraparenchymal, full-
thickness defect (Fig. 17-4). The size of the resected skin island is limited by the degree to
which it shifts the NAC on the breast in relation to the chest wall and anatomic boundaries.
◆ Mild to moderate elevation of the NAC can create a pleasing lift effect (Fig. 17-5). Excessive
lifting is not desirable, particularly with resections involving the upper inner quadrant of the
breast. In the upper inner quadrant, skin island excisions should be small, or the resection and
closure should be performed using a simple reapproximation of breast tissue and skin without
removal of any skin island.12
Chapter 17 • Oncoplastic Approaches to the Partial Mastectomy 233
Figure 17-3
A
B
C
A
B
Figure 17-4
Figure 17-5
234 Section IV • Breast Reconstruction
Incision
◆ A rounded parallelogram with two equal-length lines is drawn, thus marking the skin island
to be excised in conjunction with the underlying target lesion and surrounding tissues. The
width of the skin parallelogram can be used to estimate the distance by which the NAC becomes
shifted toward the resection after skin closure. Before making the incision, the surgeon needs
to consider how much the NAC will be deviated and balance this effect with the width of the
anticipated surgical margins. For lesions in the upper breast, incisions should be curvilinear,
following Kraissl’s lines13 (Fig. 17-6). Instead of a circumareolar pattern, Kraissl noted that the
skin tension lines run transversely owing to gravity’s effect on the breasts.
◆ For lesions in the lower breast, including the 3 o’clock and 9 o’clock positions, the parallelogram
is placed radially (Fig. 17-7). At the corner of the parallelogram that comes closest to the nipple,
the design can be positioned such that the closed incision after resection approaches the NAC
tangential to the periareolar line (see Fig. 17-7, A). This reduces deviation of the NAC toward
the lesion, a condition that can result from scar contraction. In the standing position, radial
scars at 3 o’clock or 9 o’clock generally follow Kraissl’s lines and rarely become hypertrophic.
This radial approach gives more projection to the nipple (see Fig. 17-7, B and C), avoiding the
downward displacement that can be caused by a purely horizontal scar.
Chapter 17 • Oncoplastic Approaches to the Partial Mastectomy 235
Figure 17-7
Figure 17-6
From Kraissl CJ: The selection of appropriate lines for elective
surgical incisions. Plast Reconstr Surg 1951;8:1-28.
A
B
C
236 Section IV • Breast Reconstruction
◆ In the patient example shown in fi gure 17-8, the parallelogram has been marked in the upper
breast (see fi gure 17-8, A-C) in preparation for incision.
Dissection
◆ After excision of the skin island, short-distance skin fl aps are raised along both sides of the
wound. Dissection is then carried down to the chest wall and the breast gland is lifted off the
pectoralis muscle (Fig. 17-8, D-F). An advantage of this maneuver is that it allows bimanual
palpation of the target lesion to identify where the breast tissue should be divided.
◆ After full-thickness excision of the tumor, and before mastopexy closure, four to six marking
clips are placed at the base of the defect in the surrounding fi broglandular tissue. These
radiopaque markers help the radiation oncologist target the tumor bed. Those open faces of
tissue created for mastopexy closure are not actually adjacent to cancer and do not need
be marked.
◆ For adequate evaluation of margin status by the pathologist, sharp rather than cautery dissec-
tion should be considered. The advantage of sharp dissection is that it will not alter the histo-
logic margins of the resected tissues. Larger intraparenchymal vessels can be ligated or coagulated
during the dissection and cautery can then be used on the exposed fi broglandular tissue faces
to control bleeding.
Chapter 17 • Oncoplastic Approaches to the Partial Mastectomy 237
Figure 17-8. Parallelogram partial mastectomy, preoperative and intraoperative images. A. Preoperative target marking and place-
ment of parallelogram. B. Intraoperative marking with patient in supine position. C. Rounding of parallelogram incision corners.
D. Initial skin incision revealing wide exposure over target lesion. E. Full thickness dissection back to chest wall to facilitate
delivery of target lesion. F. Inked resected specimen.
A
B
C
D
E
F
238 Section IV • Breast Reconstruction
Mastopexy Closure
◆ The fi broglandular tissue at the level of the pectoralis fascia is suffi ciently undermined so that
breast tissue advancement can be performed over the muscle, without being too extensive to
threaten the blood supply to the residual breast tissue (see Fig. 17-4, A and B). Once the fi bro-
glandular tissues are mobilized and hemostasis is obtained, the margins of the residual cavity
are shifted together by the advancement of breast tissue over muscle, and the defect is sutured
at the deepest edges using 3-0 absorbable suture (Fig. 17-8, G; see Fig. 17-4, C).
◆ The direction of tissue advancement can be adjusted depending on the locations of the fi bro-
glandular defect and the excess tissue that can be shifted to close it. In some cases, fatty tissue
from the lateral breast can be shifted medially with relatively little tissue loss being notable after
surgery. In a pendulous breast with a low-riding NAC, upward shifting can be desirable to
restore a more youthful appearance.
◆ The superfi cial layer is then closed by interrupted subdermal 3-0 absorbable sutures. Skin is
closed by 4-0 absorbable subcuticular sutures in routine fashion (Fig. 17-8, H). The cavity
between the deep and superfi cial layer will be fi lled by seroma, which will reabsorb during
radiation therapy (see Fig. 17-5).
Chapter 17 • Oncoplastic Approaches to the Partial Mastectomy 239
G
H
Figure 17-8, cont’d. G. Deep fi broglandular closure using mastopexy advancement technique to close breast tissue over exposed
muscle. H. Final skin closure after completion of mastopexy advancement.
240 Section IV • Breast Reconstruction
2. Batwing Lumpectomy with or without Mastopexy Closure
◆ This approach is particularly useful for the resection of cancers that are located deep to or in
close proximity to the NAC. The batwing approach can be performed full thickness from skin
to chest wall, but in cases where the breast is moderately large and the cancer is superfi cial, a
full-thickness resection back to the chest wall may be unnecessary.
Incision
◆ Two similar semicircle incisions are made with angled “wings” on each side of the areola (Fig.
17-9, A and B). The two half-circles are positioned to allow them to be approximated to each
other at closure. Removal of the skin wings allows the two semicircles to be shifted together
without creating redundant skin folds at closure.
Dissection
◆ Dissection is carried deep to the known cancer, although in some cases a partial-thickness dis-
section is adequate. In most situations, the dissection is carried down to the chest wall and the
breast gland is lifted off the pectoralis muscle in a fashion similar to that for the parallelogram
lumpectomy (Fig. 17-9, C and D).
◆ The principle of sharp dissection and the placement of marking clips are the same as for the
parallelogram mastopexy lumpectomy.
Mastopexy Closure
◆ After full-thickness resection, some mobilization of the fi broglandular tissue for mastopexy
closure may be required. The tissue is elevated off of the chest wall at the plane between the
pectoralis muscle and breast gland. There are relatively few major perforators in this plane, so
tissue elevation and advancement can be performed with little diffi culty, often by sweeping the
index fi nger behind the breast in this natural anatomic plane. The fi broglandular tissue is
advanced to close the resulting defect. The deepest parts are approximated by interrupted
sutures (Fig. 17-9, E). We typically secure the fi broglandular tissue to itself and do not place
anchoring stitches into the chest wall. This allows the approximated breast tissues to move
on the chest wall and adjust to fi nd their most natural way to settle in for fi nal healing. The
superfi cial layer is then closed in the same fashion as the parallelogram mastopexy lumpectomy
(Fig. 17-9, F).
◆ This procedure can cause some lifting of the nipple, which in some cases can create asymmetry
relative to the noncancerous breast. If desired, a contralateral lift can be performed afterward
to achieve symmetry.
Chapter 17 • Oncoplastic Approaches to the Partial Mastectomy 241
Figure 17-9. Batwing mastopexy lumpectomy. A. Skin incision design. B. Skin incision exposing underlying fi broglandular tissue
containing target lesion. C. Full thickness tissue resection following the segmental anatomy of the underlying ductal tree.
D. Excised specimen. E. Deep closure of fi broglandular tissue over exposed chest wall muscle. F. Final skin closure.
A
B
C
D
E
F
242 Section IV • Breast Reconstruction
3. Reduction Mastopexy Lumpectomy
◆ This procedure is used for lesions located in the lower hemisphere of the breast, from the 4
o’clock to 8 o’clock positions. Lower pole cancers that are localized or segmentally distributed
are excellent candidates for this procedure, depending in part on the size of the tumor in rela-
tion to the breast.
Incision
◆ A reduction mammoplasty keyhole pattern incision is made (Fig. 17-10, A-C). The skin above
the areola is de-epithelialized in preparation for skin closure (Fig. 17-10, D).
Dissection
◆ A superior pedicle fl ap is created by inframammary incision and undermining of the breast
tissue off the pectoral fascia to mobilize the NAC and underlying tissues (see Fig. 17-10, D).
Mobilization of the breast tissue allows palpation of both deep and superfi cial surfaces of the
tumor, which can aid the surgeon in determining the lateral margins of excision around the
target lesion (Fig. 17-10, E).
◆ For cancers located in the inferolateral or inferomedial quadrant, the keyhole pattern can be
rotated slightly to allow for a more lateral or medial excision, and the NAC is moved in a direc-
tion opposite to that of the surgical defect.14
◆ Commencing inferiorly and proceeding superiorly beneath the tumor, full-thickness excision
of the lesion is completed (Fig. 17-10, F). The excision is performed with the intent of perform-
ing an en bloc resection that includes the tumor, at least a 1-cm macroscopic margin of normal
tissue, and the skin overlying the lesion.
◆ The principle of sharp dissection and the placement of marking clips are the same as for the
parallelogram mastopexy lumpectomy.
Chapter 17 • Oncoplastic Approaches to the Partial Mastectomy 243
Figure 17-10. Reduction mastopexy lumpectomy. A. Preoperative image showing skin dimpling caused by spiculated mass at
6:00. B. Skin incision design showing keyhole incision pattern. C. Initial skin incision. D. Posterior dissection behind lesion at
level of chest wall muscle. E. Manual examination of dissected tissues facilitating excision of specimen. F. Specimen excision.
A, B, and E from Anderson BO, Masetti R, Silverstein MJ: Oncoplastic approaches to partial mastectomy: An overview of
volume-displacement techniques. Lancet Oncol 2005;6:145-147.
A
B
C
D
E
F
244 Section IV • Breast Reconstruction
Mastopexy Closure
◆ The NAC is recentralized to recreate a harmonious breast size and shape. The medial and lateral
fl aps are undermined and sutured together to fi ll the excision defect, leaving a typical inverted-
“T” scar (Fig. 17-10, G-K). Uplifting of the NAC by virtue of removal of the skin island superior
to it helps restore a youthful appearance of the breast, but can create mild asymmetry relative
to the contralateral breast (Fig. 17-10, L). If desired, a contralateral lift can be performed after-
ward to achieve symmetry.
◆ For patients with macromastia, consistent positioning of the breast for radiation therapy may
be diffi cult, resulting in dosing inhomogeneity and suboptimal treatment.14 These patients can
benefi t from reduction mastopexy lumpectomy using a unilateral or bilateral approach.
Chapter 17 • Oncoplastic Approaches to the Partial Mastectomy 245
G
H
I
J
K
L
Figure 17-10, cont’d. G. Residual fi broglandular defect after specimen excision. H. Deep fi broglandular closure over chest wall.
I. Deep fi broglandular closure. J. Superfi cial fi broglandular closure. K. Final skin closure. L. Postoperative result.
K from Anderson BO, Masetti R, Silverstein MJ: Oncoplastic approaches to partial mastectomy: An overview of volume-
displacement techniques. Lancet Oncol 2005;6:145-147.
246 Section IV • Breast Reconstruction
4. Donut Mastopexy Lumpectomy
◆ This procedure is best chosen for segmentally distributed cancers located in the upper or lateral
breast.
Incision
◆ Two concentric lines are placed around the areola and a “donut” skin island is excised (Fig.
17-11, A). De-epithelialization by separating this skin island from the underlying tissues should
be done carefully to avoid devascularization of the areolar skin (Fig. 17-11, B).
◆ The width of the donut skin island should be approximately 1 cm, but depends somewhat on
the size of areola and expected extent of excision. Removal of this tissue ring is needed to allow
both adequate access to the breast tissue and closure of the skin envelope around the remaining
fi broglandular tissue that will reduce tissue volume overall.
Dissection
◆ A skin envelope is created in all directions around the NAC. The quadrant of breast tissue
including the target lesion is fully exposed using the same dissection used for a skin-sparing
mastectomy (Fig. 17-11, C). The full-thickness breast gland is peeled off of the underlying
pectoralis muscle and delivered through the circumareolar incision (Fig. 17-11, D).
◆ The segment of breast tissue containing the tumor is resected in a wedge-shaped fashion (Fig.
17-11, E and F). The width of tissue excision required to achieve adequate surgical margins
must be weighed against the diffi culty that will be created by an oversized segmental defect.
When performing this full-thickness segmental excision, the large face of a no. 10 blade can
help make the dissection planes straight.
Mastopexy Closure
◆ The remaining fi broglandular tissue is returned to the skin envelope. The peripheral apical
corners of the fi broglandular tissue are secured to each other and also anchored to the chest
wall (Fig. 17-11, G). This maintains the proper orientation of the mobilized fi broglandular
tissue in the skin envelope during the initial phases of healing. This securing of the peripheral
apical corners of fi broglandular tissue to the chest wall is a notable exception to the general
approach to mastopexy closure where we approximate fi broglandular tissues to each other, but
not to the chest wall, to allow the tissues to shift on the chest wall during the healing phase
and fi nd the most natural location for optimal healing and preservation of breast shape. With
the donut mastopexy, the degree of separation of fi broglandular tissue from both skin and chest
wall could allow the breast gland to “fall” within the breast skin envelope rather than fi lling it
in a uniform fashion.
Chapter 17 • Oncoplastic Approaches to the Partial Mastectomy 247
A
B
C
D
E
F
G
H
Figure 17-11. Donut mastopexy lumpectomy (same patient shown in Figure 2). A. Skin incision design. B. Skin donut removed.
C. Skin fl aps raised using same technique as in skin-sparing mastectomy, but centered over the target area to be resected.
D. Delivery of fi broglandular tissue through skin incision. E. Dissection of breast segment including target lesion. F. Specimen
excised. G. Deep closure and fl ap advancement over exposed chest wall muscle. H. Pursestring periarolar closure.
248 Section IV • Breast Reconstruction
◆ A pursestring 3-0 absorbable suture is placed around the areola opening (Fig. 17-11, H). This
pursestring suture is clamped, but not tied, at a size that reapproximates the original NAC.
Interrupted inverted 3-0 absorbable sutures are placed subdermally around the NAC.
The pursestring suture is tied and then 4-0 subcuticular sutures are used to close the wound
(Fig. 17-11, I).
◆ Uplifting of the NAC can create mild asymmetry relative to the unoperated breast (Fig. 17-11, J).
If desired, a contralateral lift can be performed to achieve symmetry.
Step 4. Postoperative Care
◆ Drain use is a controversial area. We have found that drains generally are not required in partial
mastectomy cases because seroma fl uid usually is reabsorbed. However, with more extensive
dissections like the donut mastopexy lumpectomy, fl uid accumulation can become more pro-
nounced and potentially can distort the orientation of the shifted breast planes during healing.
In recent years, we have started to place small closed drains in the partial mastectomy cavity
and leave them overnight to avoid excessive fl uid accumulation in the dissected breast that
might distort the oncoplastic closure.
Chapter 17 • Oncoplastic Approaches to the Partial Mastectomy 249
I
J
Figure 17-11, cont’d. I. Final skin closure. J. Postoperative, postradiation result at 2 years following locoregional treatment.
250 Section IV • Breast Reconstruction
Step 5. Pearls and Pitfalls
◆ Complete excision of calcifi ed lesions and masses should be confi rmed with specimen radio-
graphy during surgery. Specimen radiograms can be very useful to assess the location of the
target lesion in the resected tissues and thereby determine if any of the surgical margins appear
to be too close.
◆ Multicolored inking can help orient the specimen and is best performed by the operating
surgeon. Multicolored inking kits are now available with six colors (red, blue, yellow, orange,
green, and black). They are very useful for labeling all of the surgical margins (superior, inferior,
medial, lateral, superfi cial, and deep).
◆ In oncoplastic surgery, the surgeon can undermine a very large area of the breast between the
pectoralis muscle and breast gland. This plane is generally avascular, with few perforators. If
the breast is attached at the skin level, adequate blood fl ow will be preserved.
Chapter 17 • Oncoplastic Approaches to the Partial Mastectomy 251
References
1. Anderson BO, Masetti R, Silverstein MJ: Oncoplastic approaches to partial mastectomy: An overview of volume-displacement tech-
niques. Lancet Oncol 2005;6:145-157.
2. Chen CY, Calhoun KE, Masetti R, Anderson BO: Oncoplastic breast conserving surgery: A renaissance of anatomically-based surgical
technique. Minerva Chir 2006;61:421-434.
3. Cooper AP: On the Anatomy of the Breast. London, Longman, Orme, Green, Brown, and Longmans, 1840. Special Collections, Scott
Memorial Library, Thomas Jefferson University, Philadelphia. Available at
4. National Comprehensive Cancer Network: The NCCN Breast Cancer Treatment Guidelines. The Complete Library of NCCN Clinical
Practice Guidelines in Oncology [CD-ROM] Version 1.2007. Jenkintown, Pa, National Comprehensive Cancer Network, 2007.
5. Love SM, Barsky SH: Anatomy of the nipple and breast ducts revisited. Cancer 2004;101:1947-1957.
6. Amano G, Ohuchi N, Ishibashi T, et al: Correlation of three-dimensional magnetic resonance imaging with precise histopathological
map concerning carcinoma extension in the breast. Breast Cancer Res Treat 2000;60:43-55.
7. Holland R, Hendriks JH, Vebeek AL, et al: Extent, distribution, and mammographic/histological correlations of breast ductal carcinoma
in situ. Lancet 1990;335:519-522.
8. Mai KT, Perkins DG, Mirsky D: Location and extent of positive resection margins and ductal carcinoma in situ in lumpectomy speci-
mens of ductal breast carcinoma examined with a microscopic three-dimensional view. Breast J 2003;9:33-38.
9. Silverstein MJ: An argument against routine use of radiotherapy for ductal carcinoma in situ. Oncology (Huntingt) 2003;17:1511-
1533; discussion 1533-1534, 1539, 1542 passim.
10. Silverstein MJ, Lagios MD, Recht A, et al: Image-detected breast cancer: State of the art diagnosis and treatment. J Am Coll Surg
2005;201:586-597.
11. Liberman L, Kaplan J, Van Zee KJ, et al: Bracketing wires for preoperative breast needle localization. AJR Am J Roentgenol
2001;177:565-572.
12. Grisotti A, Calabrese C: Conservation treatment of breast cancer: Reconstructive problems. In Spear SL (ed): Surgery of the Breast:
Principles and Art, 2nd ed. Philadelphia, Lippincott Williams & Wilkins, 2006, pp 147-178.
13. Kraissl CJ: The selection of appropriate lines for elective surgical incisions. Plast Reconstr Surg 1951;8:1-28.
14. Masetti R, Di Leone A, Franceschini G, et al: Oncoplastic techniques in the conservative surgical treatment of breast cancer: An over-
view. Breast J 2006;12(5 Suppl 2):S174-S180.
Step 1. Surgical Anatomy
◆ Figure 18-1 demonstrates the key anatomic structures that must be considered with breast
reconstruction.
◆ Figure 18-2 shows the relationship of the breast to the pectoralis major muscle (PM) and the
chest wall.
Step 2. Preoperative Considerations
◆ The following issues must be taken into consideration in planning postmastectomy breast
reconstruction using tissue expanders and Alloderm:
▲ Size of the breasts and patient’s breast size expectation
▲ Scars from previous biopsies, lumpectomies, or mastectomies (Fig. 18-3)
▲ Presence of skin striae
Breast Reconstruction
Postmastectomy with
Tissue Expanders
and Alloderm
Julio Hochberg and James C. Yuen
CHAPTER 18
252
Chapter 18 • Breast Reconstruction Postmastectomy with Tissue Expanders 253
Deltopectoral triangle
Clavicular
head
Sternocostal
head
Latissimus dorsi muscle
Area of breast removed
Serratus anterior muscle
Pectoralis
major
muscle
Clavicle
Suspensory
ligaments
Lobules
Ducts
Inframammary
sulcus
Ribs
Clavicle
Pectoralis
major muscle
Pectoralis
minor muscle
Figure 18-1
Figure 18-2
Figure 18-3
254 Section IV • Mastectomy
▲ Mastectomy types: modifi ed radical (Fig. 18-4, A), skin-sparing mastectomy (Fig. 18-4, B),
total skin-sparing mastectomy (Fig. 18-4, C)
▲ Unilateral or bilateral mastectomies; in unilateral mastectomies, the patient is informed about
the need for future surgery to the contralateral breast, such as reduction and mastopexy, to
improve symmetry
▲ Breast cleavage and tendency for synmastia (Fig. 18-5)
Chapter 18 • Breast Reconstruction Postmastectomy with Tissue Expanders 255
A
B
C
A
B
Figure 18-4
Figure 18-5