
Step 1. Surgical Anatomy
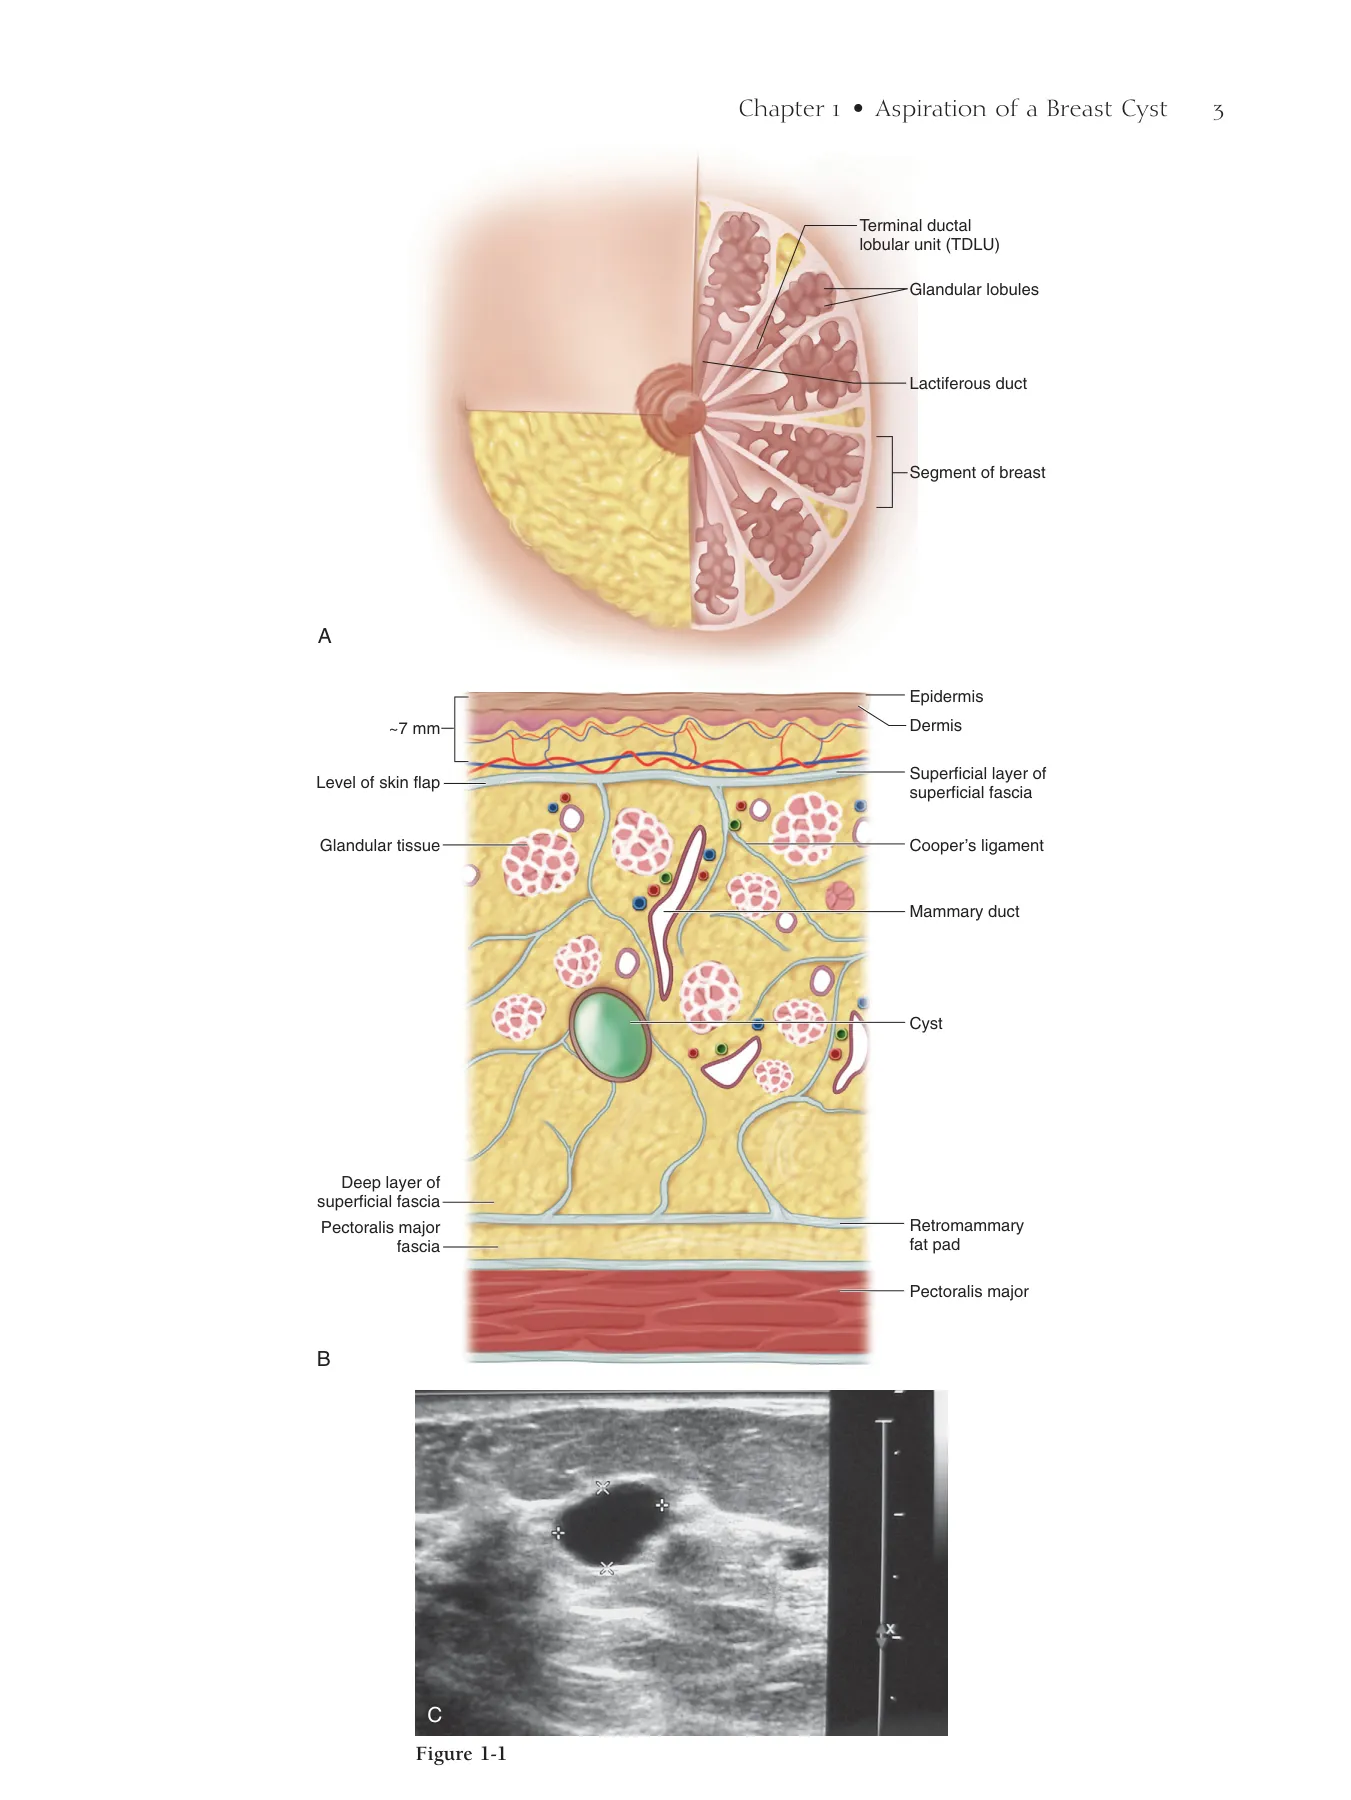
◆ A cyst is a dilated duct (Fig. 1-1).
▲ See also Fig. 1-3
Step 2. Preoperative Considerations
◆ A breast cyst should be aspirated if one cannot be sure it is a simple cyst (i.e., it is multilocu-
lated [see Fig. 1-2] or has internal echoes on ultrasonography [US]), it is painful, or it shows
signs of infection (see Chapter 2, Incision and Drainage of an Abscess).
◆ Most simple cysts, even when palpable, do not require aspiration. Explain to the patient that
a simple cyst is simply a dilated duct to calm cancer phobia and avoid unnecessary cyst aspira-
tion (Fig. 1-1, C).
◆ Unnecessary cyst aspiration may lead to hematoma or inadvertent infection of the cyst itself,
requiring later open drainage.
◆ Hematoma requires only observation.
Step 3. Operative Steps
1. Setup
◆ Use a 20-gauge 2-inch needle, an alcohol pad, and a syringe compatible with the size of the
cyst to be aspirated. A 20-gauge spinal needle may be used for deeper cysts. Usually a 5- to
10-mL syringe will suffi ce.
Aspiration of a
Breast Cyst
V. Suzanne Klimberg
CHAPTER 1
2
Chapter 1 • Aspiration of a Breast Cyst 3
Epidermis
Terminal ductal
lobular unit (TDLU)
Glandular lobules
Lactiferous duct
Segment of breast
Dermis
Superficial layer of
superficial fascia
Cooper’s ligament
Pectoralis major
Mammary duct
Cyst
Retromammary
fat pad
Glandular tissue
Level of skin flap
~7 mm
Pectoralis major
fascia
A
B
Deep layer of
superficial fascia
Figure 1-1
C
4 Section I • Excisional Biopsy/Partial Mastectomy
◆ Larger syringes are harder to handle but should be used when the cyst is larger than 2 cm in
diameter. Avoid changing a full syringe in the middle of an aspiration, which can cause loss of
positioning and bleeding.
2. Palpable Positioning
◆ Palpable positioning is not recommended and should be used only when US is not available.
◆ Position the patient fl at on the table with a bump underneath the shoulder and the arm above
the head. Occasionally there may be a reason to aspirate a cyst with the patient in the upright
position. Although not wrong, this is not ideal. If you choose to aspirate in an upright position,
make sure there is adequate assistance available should the patient faint.
◆ When cysts are located laterally or in the axilla, position the patient in a lateral decubitus posi-
tion so the breast falls medially. This may work for inframammary lesions as well, but such
lesions usually require additional retraction. Get a second assistant or use a sticky biodrape to
retract and hold the breast in one position.
3. Positioning the Ultrasound Probe
◆ Position the US probe directly over the cyst with the cyst located at the side of the probe (not
in the middle of the visible fi eld), thus indicating the shortest possible distance to the cyst
(Fig. 1-3). Before aspiration, fully scan through the cyst in all planes such that the full extent
of the cyst and any septa are known and loculated areas can be aspirated. The notch on the US
probe indicates the left side of the US fi eld, so the entry path to the cyst can always be identi-
fi ed on the visible screen. Check positioning under the probe by placing a fi nger at the edge
of transducer; the fi nger will shadow. If positioning is not accurate, an unaspirated area may
be mistakenly interpreted as a solid component or an early recurrence of the cyst on follow-up
scans.
Chapter 1 • Aspiration of a Breast Cyst 5
Figure 1-2
Figure 1-3
6 Section I • Excisional Biopsy/Partial Mastectomy
4. Positioning of the Needle
◆ Place the needle far enough away from the probe to allow entry of the needle in a plane parallel
to the US probe and to the chest wall. Most of the pain with an aspiration is from needle entry.
Place 1 mL of 1% lidocaine in the syringe before needle entry and anesthetize the skin only.
Avoid injection of the subcutaneous tissues because the injectate itself may look like a cyst. The
needle is best seen when exactly parallel to and centered under the probe. The tip of the needle
should be in the center of the cyst (Fig. 1-4).
◆ Steady your hand on the patient to control movement and maintain the plane of entry. Loss of
positioning may occur through excessive and unnecessary local anesthesia around the cyst itself.
Needle planes less than parallel and greater than 45 degrees to the plane of the US probe, along
with operator movement (in and out, side to side), cause loss of visualization.
Loss of Positioning
◆ If excessive anesthetic has been administered, put pressure on the breast and wait about 15
minutes for the anesthetic to diffuse, then relocalize. If there is diffi culty getting the needle in
the visible fi eld, try looking only at the probe and the needle (not the US screen) so as to keep
them exactly parallel on entry.
5. Aspiration
◆ Retract the syringe plunger as the needle enters the cyst. This usually results in complete and
immediate aspiration of a simple cyst. Reposition the needle under direct US visualization to
aspirate without fully withdrawing the needle from the skin (Fig. 1-5). Multiple sticks are
unnecessary, may be painful, and increase the risk of bleeding and infection.
Chapter 1 • Aspiration of a Breast Cyst 7
Cyst
Needle
Figure 1-4
Breast
US probe
Syringe in cyst
Initial positioning
Partial aspiration
Total aspiration
Figure 1-5
8 Section I • Excisional Biopsy/Partial Mastectomy
Step 4. Postoperative Care
◆ Clear aspirate from a completely aspirated cyst may be discarded. Cloudy, mucinous, bloody,
or otherwise suspect fl uid should be sent for cytology. However, the sensitivity for detecting
cancer is low (<50%).
◆ In general, it is suffi cient to hold 5 minutes of continuous pressure over the cyst location and
the tract to the aspiration site. Ensure that the pressure is continuous; avoid periodic
checking.
◆ For continued bleeding, fi rst try continuous pressure for 15 minutes. If this is insuffi cient, it
will be necessary to open the breast along the needle tract to ligate the bleeder.
◆ A dressing is usually not necessary. At most, a simple adhesive bandage is suffi cient.
◆ If the cyst is completely aspirated, any pain should immediately subside. The patient should
be followed for recurrence if detected by palpation in 1 month, or in 6 months if detected by
mammography or US.
◆ If a cyst recurs immediately (<1 week), it will need excision. If recurrent after 1 month, it can
be drained again. If the cyst recurs again, it should be excised (see Chapter 6, Excisional Breast
Biopsy of Palpable or Nonpalpable Lesions).
Chapter 1 • Aspiration of a Breast Cyst 9
Step 5. Pearls and Pitfalls
◆ Sometimes simple puncture of a cyst can result in rupture of the cyst into the surrounding
tissue without resultant fl uid in the syringe. This is not cause for concern.
◆ Sample a nonaspirating lesion with a core needle biopsy or excise using open excisional biopsy
or percutaneous vacuum-assisted needle biopsy.
◆ Inability to aspirate a lesion or incomplete aspiration may be secondary to thick fl uid or pres-
ence of a solid lesion. Bloody aspiration requires excisional biopsy because approximately 10%
of such cases are carcinoma.
◆ Incomplete aspiration requires excisional biopsy to rule out cancer (∼10%). Residual mass needs
to be treated in the same way as any nodule (i.e., palpable suspect mass).
◆ Pneumothorax is rare (<1%) and is almost always a result of palpable aspiration. Avoid by
keeping the angle of the needle parallel to the chest wall.
Bibliography
Smith DN, Kaelin CM, Korbin CD, et al: Impalpable breast cysts: Utility of cytologic examination of fl uid obtained with radiologically
guided aspiration. Radiology 1997;204:149-151.
Step 1. Surgical Anatomy
◆ Figure 2-1 provides sagittal and cross-sectional views of the relevant breast anatomy.
Step 2. Preoperative Considerations
◆ Most abscesses are subareolar. About one third are peripherally located.
◆ Incision and drainage of a breast abscess is always indicated. The diffi cult decision can be
determining, at times, whether there really is an abscess present as opposed to simple
cellulitis.
◆ Some advocate simple aspiration of an abscess and placing the patient on antibiotics. For small
abscesses, this has a reported success rate of 50%.
Step 3. Operative Steps
1. Setup
◆ Preferentially, an incisional drainage is performed in the operating room under general anes-
thesia, although it may be possible to drain a small abscess in the outpatient setting.
◆ The patient is positioned in a supine or “lawn chair” position.
◆ Rarely, the abscess is in a lower or outer quadrant of the breast. Avoid awkward operative access
by positioning such patients in the lateral decubitus position.
Incision and Drainage
of an Abscess
V. Suzanne Klimberg
CHAPTER 2
10
Chapter 2 • Incision and Drainage of an Abscess 11
Epidermis
Terminal ductal
lobular unit (TDLU)
Glandular lobules
Lactiferous duct
Ductal excision
Segment of breast
Peripheral abscess
Subareolar abscess
Dermis
Superficial layer of
superficial fascia
Cooper’s ligament
Pectoralis major
muscle
Mammary duct
Abscess
Retromammary
fat pad
Glandular tissue
Level of skin flap
~7 mm
Pectoralis major
fascia
A
B
Deep layer of
superficial fascia
Figure 2-1
12 Section I • Excisional Biopsy/Partial Mastectomy
2. Palpable Localization
◆ Palpate to locate the abscess (Fig. 2-2).
◆ Use palpable positioning only when ultrasonography needle positioning yields no abscess
fl uid.
3. Ultrasonographic Localization
◆ Use ultrasonography to attempt to locate the abscess’s central cavity (Fig. 2-3). Visualization of
the cavity is helpful, but failure to visualize the cavity does not rule out its presence.
4. Needle Localization
◆ Use a 20-gauge needle in aspiration position to fi nd the abscess cavity. In this way, the
course of the needle can be redirected without causing signifi cant harm to the patient or tissues
(Fig. 2-4).
Chapter 2 • Incision and Drainage of an Abscess 13
Figure 2-2
Figure 2-3
Figure 2-4
14 Section I • Excisional Biopsy/Partial Mastectomy
5. Incision along Needle Tract
◆ Once the abscess has been located, make an incision along the needle tract directly into the
primary abscess.
◆ The abscess often is not located directly under the area of greatest erythema.
◆ Open directly over the abscess cavity (Fig. 2-5).
◆ Do not tunnel to the abscess cavity for cosmetic reasons. Not only will this delay healing, it
may potentially prevent proper healing by allowing a pocket to re-form the abscess.
◆ If a hidden cancer is present, tunneling to a lesion may prevent breast conservation therapy for
an incompletely resected lesion.
◆ Use a fi nger to break up any loculations in the cavity.
◆ Always be cognizant of the possibility of an unusual presentation of a cancer. Always take a
biopsy of the cavity to rule out this possibility.
◆ For a subareolar abscess, make sure to remove the sinus tract as well as the segmental duct and
extend the incision under the areola because subareolar abscesses can have multiple winding
connections (Figs. 2-6 and 2-7). See also Fig. 2-1 for reference.
6. Dressing
◆ Place a sterile gauze inside the cavity with a fl uffy dressing or absorbent pad on top to collect
drainage.
◆ Have the patient take showers at home with the water directed into the wound to irrigate it.
Vary the number of showers and dressings (usually three times a day) depending on how clean
the wound appears.
◆ The patient does not need to use sterile gloves and saline to dress her own wound.
◆ The patient should wear a comfortable sports bra instead of tape to keep the dressings in
place.
Step 4. Postoperative Care
◆ With the technique described here, the patient can easily take care of such a wound at
home.
◆ It usually takes approximately 1 to 2 months for such a wound to heal. The larger the wound,
the more time it takes to heal.
◆ Antibiotics are, in general, unnecessary unless a severe cellulitis is present. The only exception
to this is the patient with previous radiation therapy. Once a wound is properly drained and
cellulitis subsides, stop any antibiotics.
◆ Instruct the patient to wick the wound for as long as possible to allow the incision to heal from
the inside and to avoid recurrent abscess.
◆ Continued or recurrent abscesses near the areola may represent a chronic subareolar abscess.
Chapter 2 • Incision and Drainage of an Abscess 15
Circumareolar
incision
for abscess
drainage
Repeated aspiration
of abscess and
antibiotics
Incision directly
over abscess for
drainage
B
Figure 2-5
Figure 2-6
Figure 2-7
16 Section I • Excisional Biopsy/Partial Mastectomy
Step 5. Pearls and Pitfalls
◆ Antibiotics are suffi cient treatment for simple cellulitis, but not an abscess. If cellulitis persists
on intravenous antibiotics, reconsider the possibility of abscess (Fig. 2-8).
◆ Open the entire area over any abscess tunnel so that it may heal directly. Alternatively, make
a counter-incision directly over the true abscess cavity and commit the patient to prolonged
wet-to-dry dressings.
◆ If the intraoperative pathologic picture is suspect for cancer, resect the palpable area with over-
lying skin. Take additional shavings from the superior, inferior, medial, lateral, and posterior
margins to attempt to clear the margin.
◆ If the wound appears “soupy,” increase the number of dressing changes. As the wound starts
to granulate, decrease the number of dressing changes.
◆ Do not “pack” the wound too tightly or you will inadvertently keep the wound open longer
than necessary. Wicking the wound will keep the wound open while allowing good drainage.
◆ Prescribing antibiotics longer than necessary may result in resistant infection, candidiasis, or
colitis.
◆ The abscess may recur if the opening of the wound is insuffi cient or is allowed to close before
the abscess’s cavity is resolved.
◆ When an abscess is near or under the areola, a diagnosis of chronic subareolar abscess should
be entertained and treated appropriately with accompanying ductal excision. If the pathologic
results indicate a chronic abscess, prescribe rotating antibiotics (doxycycline rotating with
erythromycin), 1 week on and 3 weeks off. Strongly advise the patient to stop smoking and
decrease her caffeine intake.
◆ Warn the patient that open drainage produces a signifi cant scar, but that the scar can be revised
at a later date.
Bibliography
Li S, Grant CS, Deguin A, Donohue J: Surgical management of recurrent subareolar abscesses: Mayo Clinic experience. Am J Surg
2006;192:528-529.
Scott BG, Silberfein EJ, Pham HQ, et al: Rate of malignancies in breast abscess and argument for ultrasound drainage. Am J Surg
2006;192:69-72.
Chapter 2 • Incision and Drainage of an Abscess 17
Figure 2-8
Step 1. Surgical Anatomy
◆ A familiarity with normal breast ultrasound, along with the sonographic characteristics of
benign and malignant lesions, is essential.
◆ Figure 3-1 demonstrates the normal ultrasound anatomy of the breast.
◆ Figure 3-2 illustrates the more common characteristics that distinguish benign from malignant
lesions.
Step 2. Preoperative Considerations
◆ Repeat a diagnostic ultrasound to confi rm the fi ndings and interpretation of any outside
studies.
◆ Document the lesion in terms of size and location (Fig. 3-3) in both the longitudinal and trans-
verse planes.
◆ Perform a clinical breast examination to exclude associated palpable lesions.
◆ The patient should be presented with the risks and benefi ts of the procedure as well as the
alternatives (i.e., open biopsy).
Ultrasound-Guided
Percutaneous
Excisional Biopsy
Richard E. Fine
CHAPTER 3
18
Chapter 3 • Ultrasound-Guided Percutaneous Excisional Biopsy 19
Skin
Subcutaneous
Glandular tissue
Retromammary fat
Pectoral muscle
Pleura
Age - 28
Skin
Subcutaneous
Glandular tissue
Retromammary fat
Pectoral muscle
Pleura
Age - 28
Figure 3-1
Smooth / sharp
Indistinct / jagged
Grows within tissue planes
Disrupted
Transverse > Longitudinal
Longitudinal > Transverse
Posterior enhancement
Posterior shadowing
Benign
Malignant
Margins
Adjacent
architecture
Shape
Retrotumoral
effect
Figure 3-2
Transverse
Longitudinal
Transverse
Longitudinal
x 1.23cm
x 0.98cm
x 0.70cm
x 1.23cm
x 0.98cm
x 0.70cm
Figure 3-3
20 Section I • Excisional Biopsy/Partial Mastectomy
◆ The indications for percutaneous excisional biopsy with ultrasound guidance include but are
not limited to the following:
▲ Nonoperative potential therapy for benign lesions: (1) diagnosis of probably benign and
indeterminate masses (Breast Imaging Reporting and Data System [BI-RADS] scores 3 and 4;
Fig. 3-4; see Fig. 3-3); (2) to remove palpability and/or image evidence of the lesion.
▲ Nonoperative potential therapy for malignant lesions: (1) suspect and highly suspect masses
or densities (BI-RADS scores 4 and 5; Figs. 3-5 and 3-6); (2) lesions not larger than 1 cm,
using a large intact sample device.
◆ The percutaneous excisional biopsy devices most commonly used include vacuum-assisted
biopsy devices and large intact sample devices.
◆ Decisions regarding the choice of biopsy instrument are physician dependent and may be
infl uenced by their desire to better preserve the histologic architecture for the pathologist.
Figure 3-7 shows a pathologic section from a whole lesion removed intact.
◆ The patient should be questioned about allergies, the use of anticoagulants or aspirin, and a
history of bleeding diathesis.
Chapter 3 • Ultrasound-Guided Percutaneous Excisional Biopsy 21
Probably benign
Probably benign
Shadowing
12 O’clock
Left
Transverse
4.1 cm
12 O’clock
Left
Transverse
4.1 cm
Shadowing
Figure 3-4
Figure 3-5
Figure 3-6
Figure 3-7
22 Section I • Excisional Biopsy/Partial Mastectomy
Step 3. Operative Steps
1. Preparation and Positioning
◆ The positions of the patient, the physician, and the equipment are essential to the success
of the procedure. The patient is positioned supine on the procedure table with a pillow under
the shoulder to tilt the patient’s breast away from the physician (Fig. 3-8). The ultrasound
equipment is positioned on the side opposite to that on which the surgeon is standing. The
physician is then positioned with a direct line of sight that includes the biopsy instrument, the
ultrasound transducer on the breast, and the ultrasound monitor (Fig. 3-9).
◆ The lesion is visualized and the ultrasound transducer is positioned to visualize the greatest
diameter of the lesion and to place the lesion in the middle of the ultrasound monitor screen.
The transducer is tilted away from the physician (“heel to toe”) to allow the device insertion to
be more parallel with the transducer face (Fig. 3-10).
2. Local Anesthetic and Incision
◆ The breast skin is prepared with an antiseptic and encircled with sterile towels or a disposable
aperture drape. Individual packets of sterile ultrasound gel or povidone-iodine gel are
available.
◆ Local anesthetic is injected at the site on the skin where the appropriate insertion has been
determined (Fig. 3-11, A). The injection of deep local anesthetic into the breast parenchyma
is performed under direct ultrasound visualization. Local anesthetic is placed on a tract
leading beneath the lesion, as well as on the top and both sides of the lesion. Instillation of
the local anesthetic may also be used to lift or separate the lesion from the chest wall or skin.
Fig. 3-11, B shows the needle going under the lesion.
Chapter 3 • Ultrasound-Guided Percutaneous Excisional Biopsy 23
A
Needle
B
Lesion
Figure 3-8
Figure 3-9
Figure 3-10
Figure 3-11
24 Section I • Excisional Biopsy/Partial Mastectomy
◆ The depth of the lesion on the ultrasound monitor is noted and the choice of incision site is
chosen by visually triangulating the distance from the lateral edge of the transducer, which will
allow the device to be inserted beneath the lesion (Fig. 3-12, also see Fig. 3-10).
◆ A small skin incision is made at the entry site for the biopsy device. The size of the incision is
device dependent, but usually ranges from 3 to 8 mm in length.
3. Biopsy
◆ The biopsy device is manually inserted into the breast and guided beneath the lesion (Figs.
3-13, A and B). If the lesion is in close proximity to the chest wall, it may be benefi cial to insert
the large intact loop device slightly to the left (7 o’clock) to allow the loop to extend parallel
to the chest before looping over the lesion.
Chapter 3 • Ultrasound-Guided Percutaneous Excisional Biopsy 25
Figure 3-12
Lesion
Needle
Figure 3-13
26 Section I • Excisional Biopsy/Partial Mastectomy
◆ The alignment of the image-detected abnormality with the biopsy device must be verifi ed with
a 90-degree cross-sectional view to ensure the lesion did not move or shift during device place-
ment (Fig. 3-14, A). Both the vacuum-assisted and large intact sample loop devices are direc-
tional, allowing for slight offset from the device sampling area (Figs. 3-14, B and C).
◆ The image-detected lesion is adequately sampled for diagnosis and potential therapeutic removal.
Because the devices have directional capabilities, the sampling pattern is adjusted based on the
position of the device in relation to the lesion.
◆ With the vacuum-assisted device appropriately positioned, the lesion is excised in multiple
cores, beginning at the deepest aspect and proceeding superfi cially both superiorly and inferi-
orly by rotating the position of the sampling aperture (Fig. 3-15).
Chapter 3 • Ultrasound-Guided Percutaneous Excisional Biopsy 27
A
Needle in
transverse view
B
C
Figure 3-14
Figure 3-15
28 Section I • Excisional Biopsy/Partial Mastectomy
◆ Typical cores are shown in Figure 3-16.
◆ The large intact sample loop device has a radiofrequency-activated cutting loop that is brought
out laterally (3 o’clock) and circumferentially rotated over the top of the lesion 180 degrees,
followed by loop closure, which completes the excision with the lesion contained within a small
attached sampling bag (Fig. 3-17). The device is withdrawn from the breast, maintaining loop
closure, and the intact specimen is delivered (Fig. 3-18).
4. Postbiopsy
◆ If all imaging-detected aspects of the abnormality have been removed, consideration should be
given to placing a marker that is both radiopaque and ultrasound visible. This ensures the ability
to go back to the area for further intervention based on pathologic results (e.g., cancer, atypia,
or discordant pathology). If the results are benign and concordant, the marker is then used to
follow the patient with future imaging studies.
5. Closing
◆ Manual compression is used to obtain adequate hemostasis.
◆ The skin nick is closed with Steri-Strips and a Tegaderm dressing. Suture closure is rarely
indicated.
◆ The patient is put in a compression wrap with an ice pack, if indicated.
Chapter 3 • Ultrasound-Guided Percutaneous Excisional Biopsy 29
Figure 3-16
Figure 3-17
Figure 3-18
30 Section I • Excisional Biopsy/Partial Mastectomy
Step 4. Postoperative Care
◆ It is the physician’s responsibility to confi rm that the pathologic results are concordant with
the imaging study impression. If discordance is identifi ed, further intervention is necessary and
may include repeat biopsy or open surgical excision.
◆ If a diagnosis of malignancy is obtained, the patient is scheduled for defi nitive therapeutic
surgery.
◆ If the diagnosis is of a benign nature, the patient should be placed on the appropriate follow-up
protocol to include a repeat mammogram or ultrasound in 4 to 6 months.
Step 5. Pearls and Pitfalls
◆ Use of the vacuum-assisted device for percutaneous excision removes the lesion in a piecemeal
fashion. As the lesion gets smaller, it becomes more diffi cult to visualize residual portions of
the lesion. It is therefore crucial to rotate the sampling aperture superiorly and inferiorly (wind-
shield-wiper fashion) from the very beginning of the procedure to ensure removal of the entire
width of the lesion. Examining the quality of the cores can also be helpful to ensure that por-
tions of the mass are not still visible within individual cores.
◆ The height of the fully extended large intact sample loop device is 1.5 cm. When a lesion is
superfi cial or in a portion of the breast with a narrow clearance between skin and chest wall,
there is danger of the loop contacting and perforating the skin. Several preventative options are
available, including retracting the loop several millimeters as it is rotated beneath the skin; using
local anesthetic to lift the skin away from the top edge of the lesion; and inserting the device
to the top, right-hand side of the lesion (1 o’clock), extending the loop parallel to the underside
of the skin (9 o’clock), and rotating the loop downward beneath the lesion and then upward
to complete the excision.
Chapter 3 • Ultrasound-Guided Percutaneous Excisional Biopsy 31
Bibliography
Fine RE, Boyd BA, Whitworth PW, et al: Percutaneous removal of benign breast masses using a vacuum-assisted hand-held device with
ultrasound-guidance. Am J Surg 2002;184:332-336.
Fine RE, Staren ED: Updates in breast ultrasound. Surg Clin North Am 2004;84:1001-1034.
Fine RE, Staren ED: Percutaneous radiofrequency-assisted excision of fi broadenomas. Am J Surg 2006;192:545-547.
Fine RE, Whitworth PW, Kim JA, et al: Low-risk palpable breast masses removed using a vacuum-assisted hand-held device. Am J Surg
2003:186:362-367.
Johnson AT, Henry-Tillman RS, Smith LF, et al: Percutaneous excisional breast biopsy. Am J Surg 2002;184:550-554.
Lechner M, Day D, Kusnick C, et al: Ultrasound visibility of a new breast biopsy marker on serial evaluation. Radiology
2002;223(Suppl):115.
Meloni GB, Dessole DS, Becchere MP, et al: Ultrasound-guided Mammotome vacuum biopsy for the diagnosis of impalpable breast lesions.
Ultrasound Obstet Gynecol 2001;18:520-524.
Morris E, Liberman L, Trevisan S, et al: Histologic heterogeneity of masses at percutaneous breast biopsy. Breast J 2002;8:187-191.
Simon JR, Kalbhen CL, Cooper RA, et al: Accuracy and complications rates of US-guided vacuum-assisted core breast biopsy: Initial results.
Radiology 2000;215:694-697.
Sperber F, Blank A, Mester U, et al: Diagnosis and treatment of breast fi broadenomas by ultrasound-guided vacuum-assisted biopsy. Arch
Surg 2003;138:796-800.
Step 1. Surgical Anatomy
◆ Familiarity with the normal mammogram, along with the morphologic features of those lesions
that constitute an abnormal mammogram and indications for biopsy, is essential.
◆ Figure 4-1 demonstrates the radial lobar anatomy of the breast, comprising the parenchyma,
fi brous network, and adipose elements.
◆ Figure 4-2 shows a histopathologic section of the normal terminal duct lobular unit (TDLU),
the structure responsible for most of the mammographic abnormalities detected.
◆ Figure 4-3 illustrates the morphologic features of benign-appearing (Fig. 4-3, A) and malignant-
appearing (Fig. 4-3, B) microcalcifi cations (the mammographic abnormality that is the most
common indication for stereotactic breast biopsy). Benign lobular calcifi cations (“pearl-like,”
round, dense calcifi cations) form as spherical molds within the acini of the TDLU (see Fig.
4-3, A). Linear, casting calcifi cations with clefts associated with high-grade ductal carcinoma in
situ (DCIS) follow the longitudinal mold of the duct and its branches (see Fig. 4-3, B).
Step 2. Preoperative Considerations
◆ Confi rm that a complete diagnostic imaging work-up has been completed:
▲ Special mammogram views (compression for masses or magnifi cation for calcifi cations)
▲ Breast ultrasonography
◆ Perform a clinical breast examination.
◆ The patient should be presented with the risks and benefi ts of the procedure as well as
alternatives.
Stereotactic Breast Biopsy
Richard E. Fine
CHAPTER 4
32
Chapter 4 • Stereotactic Breast Biopsy 33
Lobule
Nipple
Fat
Pectoralis
muscle
Terminal ductal
lobular unit
Ribs
Ductules
Terminal
duct
A
Acini
Benign (acinar) calcifications
Terminal duct
Terminal duct
TDLU
TDLU
DCIS
B
DCIS (ductal) Malignant Calcifications
Benign Lobular Calcifications
Figure 4-1
Figure 4-2
Figure 4-3
34 Section I • Excisional Biopsy/Partial Mastectomy
◆ The indications for image-guided breast biopsy with stereotactic guidance include, but are not
limited to, the following:
▲ Highly suspect microcalcifi cations or densities (Breast Imaging Reporting and Data System
[BI-RADS] score 5) to confi rm the diagnosis and facilitate treatment (Fig. 4-4)
▲ Indeterminate or suspect microcalcifi cations or densities (BI-RADS 4; Fig. 4-5)
▲ Probably benign microcalcifi cations or densities (BI-RADS 3) when there are valid clinical
indications, including but not limited to a patient with a strong family history, diffi cult clini-
cal and imaging examination, or a patient with a high level of anxiety
▲ Multifocal or multicentric lesions to facilitate treatment planning
◆ BI-RADS 2 lesions are benign, as are the coarse calcifi cations seen in Figure 4-5, and do not
require biopsy.
◆ The diagnostic biopsy devices most commonly used include but are not limited to the auto-
mated needle core device, vacuum-assisted biopsy devices (most common), and the large intact
sample device.
◆ Decisions regarding the choice of biopsy instrument are physician dependent and may be
infl uenced by the extent of lesion removal desired, which can be controversial.
◆ The patient should be questioned about allergies, the use of anticoagulants or aspirin, and a
history of bleeding diathesis.
◆ The patient’s weight and tolerance to remaining prone for the procedure are assessed for appro-
priateness of the procedure for that patient.
Step 3. Operative Steps
1. Preparation and Positioning
◆ Review the mammogram with the stereotactic technologist to establish the proper approach to
the breast (cranial-caudal, medial-lateral, lateral-medial, or caudal-cranial).
◆ A cranial-caudal approach could be used for a lesion in the superior portion of the breast;
however, if the lesion is lateral in the breast, a lateral-medial approach may be preferred because
the lesion may be lower in the breast than it appears on the mediolateral oblique mammogram
view. A medial lesion would require a medial-lateral or cranial-caudal approach. On the Lorad
Multicare Platinum Stereotactic Table (Hologic, Inc., Bedford, MA), a lesion in the inferior
aspect of the breast can be accessed using the caudal-cranial approach.
◆ The patient is positioned on the prone stereotactic table for visualization of the image-detected
abnormality in a manner that affords the shortest distance to the lesion, but also taking into
consideration the approach that best demonstrates the lesion (Fig. 4-6).
Chapter 4 • Stereotactic Breast Biopsy 35
BI-RADS 4
BI-RADS 2
Figure 4-4
Figure 4-5
Figure 4-6
36 Section I • Excisional Biopsy/Partial Mastectomy
◆ A scout x-ray image in acquired. Regardless of the approach to the breast (cranial-caudal,
medial-lateral, lateral-medial, or caudal-cranial), this image is taken perpendicular to the com-
pressed breast. Figure 4-7 is a diagrammatic representation of a lesion detected on the prone
cartesian stereotactic biopsy system. Figure 4-8, A is a scout image of calcifi cations for a vacuum-
assisted biopsy procedure. Figure 4-8, B is a scout image for a procedure using a large intact
sample loop device.
Chapter 4 • Stereotactic Breast Biopsy 37
Image-
detected
lesion
Breast in
compression
Scout image
Image
receptor
Breast
support
Tube head
Compression
paddle
-15
0˚
Z
+15
Stereotactic Imaging
Cartesian Coordinate System
Figure 4-7
A
B
Figure 4-8
38 Section I • Excisional Biopsy/Partial Mastectomy
◆ The scout image is addressed to confi rm appropriate position of the abnormality within the
middle one third of the image. If the lesion is not within the middle third of the scout image,
it may be thrown out of view on one of the two 15-degree stereotactic images, therefore making
the lesion unavailable for targeting (Fig. 4-9).
◆ A stereotactic pair of images, −15 degrees and +15 degrees off center from the scout image, are
taken. Figure 4-10 is a diagrammatic representation of the x-ray tube head movement on the
prone cartesian stereotactic biopsy system. Figure 4-11, A is a stereopair image for a vacuum-
assisted biopsy procedure. Figure 4-11, B is a stereopair image for a large intact sample loop
device procedure.
Chapter 4 • Stereotactic Breast Biopsy 39
+15
-15
+15
-15
Correct Positioning
Scout
Stereo
Image receptor
Scout
Stereo
Image receptor
Incorrect Positioning
Figure 4-9
Stereotactic Imaging
Cartesian Coordinate System
Stereo
images
Image
receptor
Breast
support
X
Z
First
stereo image
Second
stereo image
Tube head
Compression
paddle
Image-
detected
lesion
Breast in
compression
-15
+15
-15°
+15°
0°
Figure 4-10
A
B
Figure 4-11
40 Section I • Excisional Biopsy/Partial Mastectomy
◆ The physician then places a target on the lesion in each of the stereotactic images using the
computer mouse and the image monitor (Fig. 4-12). The system software then determines the
accurate coordinates (horizontal, vertical, and depth) of the abnormality in the breast and
transfers this information to the biopsy instrument stage.
◆ A unique procedure, referred to as z-zero, is performed at this time if using the Hologic Multi-
care Platinum Table. The stereotactic principles of this platform determine the depth of the
lesion from the front compression paddle forward into the breast. Because each breast has a
unique compression thickness, the system software must “know” where z equals zero for each
device for the patient who is in compression. The device is placed on the biopsy instrument
stage and motor driven to the predetermined z position, where it is then manually aligned with
the reference point on the front compression paddle. The z-zero button then “zeros out” the
device for this patient.
◆ With the biopsy device of choice properly positioned on the biopsy device stage, the physician
uses the automated software to guide the needle or biopsy probe to the correct horizontal and
vertical coordinates.
◆ Because published studies have illustrated the limitations of automated Tru-cut biopsy
needles with regard to diagnostic upgrading, the most common device used for stereotactic
biopsy is the vacuum-assisted biopsy device (Fig. 4-13). A more recent category of stereo-
tactic biopsy devices is the large intact sample loop device (Fig. 14-14). Early evidence with
the intact sample device supports improved preservation of pathologic architecture and the
potential for therapeutic application.
◆ The vertical or y value is adjusted so the biopsy instrument will be inserted beneath the lesion
to be sampled (4 mm below for vacuum-assisted devices, and 8 mm below for the large intact
sample loop device).
◆ The surgeon and mammographer position themselves on either side of the patient to direct the
needles and remove specimens (Fig. 4-15).
◆ The needle/probe is advanced up to the skin surface for determination of the incision and device
entrance site (Fig. 4-16).
2. Local Anesthetic and Incision
◆ The breast skin within the 5 × 5-cm opening on the front compression paddle is prepared with
an antiseptic.
◆ Local anesthetic is injected at the site on the skin determined by aligning the needle tip at the
calculated horizontal and vertical coordinates. The injection of deep local anesthetic into the
breast parenchyma is based on physician preference and biopsy device type (see Fig. 4-16).
◆ A small skin incision is made at the entry site for the biopsy device. The size of the incision is
device dependent, but usually ranges from 3 to 8 mm in length.
Chapter 4 • Stereotactic Breast Biopsy 41
Figure 4-12
Figure 4-13
Figure 4-14
Figure 4-15
Figure 4-16
42 Section I • Excisional Biopsy/Partial Mastectomy
3. Biopsy
◆ The biopsy device is manually inserted into the breast to the predetermined depth (z value).
Many of the biopsy devices have precalculated “pullback” depths that are based on the specifi c
device’s mechanics. Use of the pullback depth will center the imaged abnormality in that par-
ticular device’s sampling area. Again, whether a biopsy device is advanced forward in the breast
using the spring-loaded device driver or manually inserted to align the sampling aperture with
the lesion is operator and device dependent.
◆ The alignment of the image-detected abnormality with the biopsy device must be verifi ed with
a pair of prestereotactic or poststereotactic images to confi rm accurate placement of the biopsy
device and to ensure the lesion did not move or shift during device placement. Figure 4-17
shows microcalcifi cations aligned with the sampling aperture of the vacuum-assisted biopsy
device on 15-degree views.
◆ Figure 4-18 shows the large intact sample loop device positioned for radiofrequency activation
and tissue cutting. Before obtaining the stereopair images, an additional scout image is obtained
with the large intact sample loop device in the breast to verify the orientation of the device
(clock position) in relation to the target lesion (see Fig. 4-18, inset).
◆ The image-detected lesion is adequately sampled for diagnosis and potential therapeutic removal.
Because the devices have directional capabilities, the sampling pattern is adjusted based on the
position of the device in relation to the lesion.
◆ The number of cores taken with a vacuum-assisted device averages 12 to 15 for the smaller
(11- to 14-gauge) and 6 to 8 for the larger (7- to 9-gauge) devices, depending on the size of
the lesion and the physician’s preference as to whether to remove all image-based evidence of
the lesion (Fig. 4-19).
◆ The loop on the large intact sample device is activated with radiofrequency (from a standard
generator) and extended to a full loop height of 1.5 cm. The loop is then rotated in a counter-
clockwise direction approximately 240 degrees and then pulled closed, trapping the tissue in
the attached sample bag (Fig. 4-20). The inset in Figure 4-20 shows the resultant large intact
sample.
Chapter 4 • Stereotactic Breast Biopsy 43
Figure 4-17
Figure 4-18
Figure 4-19
Figure 4-20
44 Section I • Excisional Biopsy/Partial Mastectomy
◆ Stereopair images are taken to assess the adequacy of the biopsy, which may be infl uenced by
the goals of the physician in removing all image-based evidence of the lesion (Fig. 4-21).
4. Postbiopsy
◆ If all imaging-detected aspects of the abnormality have been removed, consideration should be
given to placing a marker that is both radiopaque and ultrasound visible. This ensures the ability
to go back to the area for further intervention based on pathologic results (e.g., cancer, atypia,
or discordant pathology). If the results are benign and concordant, the marker is then used to
follow the patient with future imaging studies. Stereotactic images are taken to confi rm clip
placement; Figure 4-22 is post vacuum-assisted device biopsy and Figure 4-23 is post large
intact sample loop device biopsy.
Chapter 4 • Stereotactic Breast Biopsy 45
Figure 4-21
Figure 4-22
Figure 4-23
46 Section I • Excisional Biopsy/Partial Mastectomy
◆ A specimen radiograph is obtained to document appropriate sampling in cases where micro-
calcifi cations were the target lesion. The presence of calcifi cations in the core sample increases
the accuracy of the biopsy and makes it less likely the diagnosis will be upgraded. Figure 4-24
shows core samples from an 8-gauge vacuum-assisted device biopsy. Figure 4-25 is a specimen
radiograph of a sample obtained with an intact sample loop device. Preservation of the histologic
architecture is demonstrated in this low-power view of a pathology slide that clearly shows the
three small hyalinizing fi broadenomas associated with the pattern of calcifi cations on the large
intact specimen radiograph (Fig. 4-26).
5. Closing
◆ Manual compression for 10 minutes is used to obtain adequate hemostasis.
◆ The skin nick is closed with Steri-Strips and a Tegaderm dressing or skin glue. Suture closure
is rarely indicated.
◆ For facilities that have access to mammography, a postprocedure mammogram is ideal to verify
that there has been no clip migration.
◆ The patient is put in a compression wrap with an ice pack, if indicated (Fig. 4-27).
Step 4. Postoperative Care
◆ It is the physician’s responsibility to confi rm that the pathologic results are concordant with
the impression of the radiologic imaging study. If a discordance is identifi ed, further interven-
tion is necessary and may include repeat biopsy or open surgical excision.
◆ An unexcised papilloma, atypical hyperplasia, or a diagnosis of malignancy requires the patient
to be scheduled for defi nitive therapeutic surgery.
◆ If the diagnosis is of a benign nature, the patient should be placed on the appropriate follow-up
protocol to include a repeat mammogram or ultrasonogram in 4 to 6 months.
Chapter 4 • Stereotactic Breast Biopsy 47
Figure 4-24
Figure 4-25
Figure 4-26
Figure 4-27
48 Section I • Excisional Biopsy/Partial Mastectomy
Step 5. Pearls and Pitfalls
◆ The most treacherous potential pitfall is performing a stereotactic biopsy on the wrong abnor-
mality. Stereotactic biopsy imaging is limited to a 5 × 5-cm area of the breast, and there is a
learning curve involved in identifying a lesion on a full fi lm-screen mammogram and recogniz-
ing the same lesion on a magnifi ed, digitized reproduction on the system monitor without seeing
its relationship to the surrounding mammographic breast anatomy. It is the responsibility of
the physician performing the biopsy (not the stereotactic technologist) to sample the correct
abnormality. A postbiopsy mammogram can document removal.
◆ A common patient characteristic that may lead to a diffi cult biopsy is small breast size (com-
pression thickness < 25 mm). With a small breast or a more posterior-positioned breast lesion,
the biopsy device may impale the back side of the breast or compression paddle (negative stroke
margin). The stereotactic table software allows the physician to confi rm an adequate distance
from the biopsy needle tip to the back compression paddle (stroke margin; Fig. 4-28).
◆ There are several methods to correct for a negative stroke margin. These include but are not
limited to the following:
▲ A different approach to the breast lesion (lateral vs. medial)
▲ Manual insertion of the biopsy device without using automated fi ring
▲ Use of a lateral arm. The lateral arm is attached at a 90-degree angle to the MammoTest
(Siemens Medical, New York, NY) stereotactic table C-arm (parallel to the compression and
image receptor paddles) to hold the biopsy device platform. The biopsy needle can then be
inserted from the lateral or side approach.
▲ Double-paddle technique. The double-paddle technique creates an air gap behind the breast
with the use of a second compression paddle (with a 5 × 5-cm biopsy opening). The skin
on the back of the breast may also protrude into the compression paddle opening, thus
avoiding puncture.
◆ It is important for the physician to recognize targeting errors, where the target lesion has shifted
position in relation to the sampling area of the biopsy device. Figure 4-29 illustrates a horizontal
targeting error where the target lesion has shifted either to the right or the left of the biopsy
instrument. The clock-face diagram shows how the directional capability of the biopsy device
is used to adjust for such targeting errors.
Bibliography
American College of Radiology: BI-RADS—Mammography, 4th ed. In: ACR Breast Imaging Reporting and Data System, Breast Imaging
Atlas. Reston, Va, American College of Radiology, 2003.
American Society of Breast Surgeons: Performance and Practice Guidelines for Stereotactic Breast Procedures. Available at www.
breastsurgeons.org/PDF/StereoPerforGuidelines0807.pdf.
Burbank F: Stereotactic breast biopsy of atypical ductal hyperplasia and ductal carcinoma in situ lesions: Improved accuracy with directional
vacuum-assisted biopsy. Radiology 1997;202:843-847.
Burbank F, Forcier N: Tissue marking clip for stereotactic breast biopsy: Initial placement accuracy, long-term stability and usefulness as
a guide for wire localization. Radiology 1997;205:407-415.
Fine R: Image-directed breast biopsy. In Winchester DJ, Winchester DP (eds): Breast Cancer: Atlas of Clinical Oncology. Hamilton, Ontario,
BC Decker, 2000, pp 65-88.
Fine RE, Boyd BA: Stereotactic breast biopsy: A practical approach. Am Surg 1996;62:96-102.
Kass R, Kumar G, Klimberg VS, et al: Clip migration. Am J Surg 2002;184:325-331.
Liberman L, Cohen MA, Dershaw DD, et al: Atypical ductal hyperplasia diagnosed at stereotaxic core biopsy of breast lesions: An indica-
tion for surgical biopsy. AJR Am J Roentgenol 1995;164:1111-1113.
Liberman LL, Dershaw DD, Rosen PR, et al: Stereotactic 14-gauge breast biopsy: How many core biopsy specimens are needed? Radiology
1994;192:793-795.
Liberman L, Dershaw DD, Rosen PP, et al: Stereotaxic core biopsy of breast carcinoma: Accuracy of predicting invasion. Radiology
1995;194:379-381.
Liberman LL, Evans WP, Dershaw DD, et al: Radiography of microcalcifi cations in stereotaxic mammary core biopsy specimens. Radiology
1994;190:223-225.
Meyer JE, Lester SC, Grenna TH, White FV: Occult breast calcifi cations sampled with large-core biopsy: Confi rmation with radiography
of the specimen. Radiology 1993;188:581-582.
Parker SH, Burbank F: State of the art: A practical approach to minimally invasive breast biopsy. Radiology 1996;200:11-20.
Parker SH, Lovin JD, Jobe WE, et al: Nonpalpable breast lesions: Stereotactic automated large-core biopsies. Radiology
1991;180:403-407.
Chapter 4 • Stereotactic Breast Biopsy 49
Post - Fire
Compression
thickness
Stroke
margin
Stroke
margin
Stroke (mm)
Lesion
Lesion
Biopsy
compression
plate
Post - Fire
Compression
thickness
Biopsy
compression
plate
4mm
safety zone
Breast
support/
image
receptor
Breast
support/
image
receptor
A
B
Stroke Margin
Stroke (mm)
(<0) Lorad
(<4) Fischer
Negative Stroke Margin
Horizontal Error
Probe is to the left
Probe is to the right
Figure 4-28
Figure 4-29
Step 1. Surgical Anatomy
◆ Breast ducts are numerous and lack predictable branching patterns (Fig. 5-1). Older texts
describe 20 to 25 ducts exiting the nipple on the basis of histologic studies. Functional exami-
nations during lactation and more modern attempts to cannulate ducts suggest the real number
of complete ductal units that are functional and involved with breast cancer may be as little as
7 to 12 in many patients.
◆ The nonfunctional ducts may end in a saclike structure close to the areolar edge and give rise
to the common periareolar abscess. These ducts are usually not connected to large regions of
functional breast tissue.
◆ Usually two or three major ductal trees drain over two thirds of the breast volume. These are
commonly associated with the outer few millimeters of the nipple papilla and anatomically form
large coating regions such as in the upper outer quadrants. Central ductal units tend to be
smaller and more teardrop-shaped in the distribution of their branches. All branches can be
straightened out by simply pulling outward on the nipple papilla.
Step 2. Preoperative Considerations
◆ The most common indications for breast ductoscopy are to identify causes of pathologic nipple
discharge and, if necessary, to direct the intraoperative excision of the suspect lesion (Fig.
5-2).
◆ Bloody or high-volume clear discharge usually is associated with relatively large and easy-to-
cannulate ducts at the nipple papilla surface.
◆ Most Tis and T1 breast cancers (>90%) express fl uid from the ductal orifi ce connected to the
tumor. The volumes of fl uid can be quite small. To best elicit fl uid on the day of lumpectomy
and be able to correctly identify the duct connecting to the cancer, it is important to keep the
patient very well hydrated, warm the nipple region, give relaxation drugs, and massage the
breast from periphery to center after careful dekeratinization of the nipple papilla surface. If
fl uid is not obtained, occasionally a nursing pump/nipple aspirator may be used.
◆ When obtaining preoperative core biopsies, it is important to sample the lesion from the back
side to maintain the nipple-ductal connection for intraoperative ductoscopy.
Breast Ductoscopy
William C. Dooley
CHAPTER 5
50
Chapter 5 • Breast Ductoscopy 51
Lymph node
Milk duct
Lactiferous
duct
Papilloma
Milk gland
Fat
Subcutaneous
abscess
Subareolar
abscess
Cyst
Fascia of
pectoralis major
Retromammary fat plane
Pectoralis major
Pectoralis minor
Rib
Ductal carcinoma
in situ (DCIS)
Terminal ductal
lobular unit (TDLU)
Invasive mammary
carcinoma
Muscle
Lobules
Ducts
Normal
Diseased
Side view of breast
Micro-endoscope
Figure 5-1
Figure 5-2